14 Jun

Kompletter Guide für das WordPress SEO Plugin von Yoast

Kompletter Guide für das WordPress SEO Plugin von Yoast

Das WordPress SEO Plugin von Yoast ist eines der umfangreichsten Plugins um wichtige Aspekte der Onpage Optimierung direkt aus dem WordPress Backend zu steuern. Das Plugin wurde bereits über 7 Mio. Mal heruntergeladen und wird auch auf größeren Seiten wie z.B. Mashable oder Search Engine Land verwendet.

Beim Aufbau des Plugins merkt man, dass die Entwickler Joost de Valk und Barry Kooij von ihrer jahrelangen WordPress-Erfahrung profitieren und die Dinge so umgesetzt haben, wie sie es sich auch persönlich wünschen würden um ihre Arbeit zu erleichtern.

Aus diesem Grund ist das Plugin „out of the box“ schon brauchbar, aber bei der Advanced Einstellung sollte man doch genau wissen, was man tut.

Step by Step

  1. Dashboard
  2. Titles & Metas
  3. Social
  4. XML Sitemaps
  5. Permalinks
  6. Interne Links
  7. RSS
  8. Import & Export
  9. Dateien editieren
  10. WordPress SEO Box
  11. Premium Plugin

Dashboard

Tracking

Mit diesem Häkchen erlaubt man dem Plugin verschiedene Daten seiner WordPress Installation zu ermitteln, wie z.B. welches Theme oder welche anderen Plugins installiert wurden. Diese Daten sollen der Verbesserung des Plugins dienen.

Sicherheit

Mit dem zweiten Häkchen verhindert man die Anzeige der WordPress SEO Box, die individuellen Einstellungen auf Artikelformaten und Taxonomien dient. Mithilfe der SEO Box kann man beispielsweise Inhaltstypen umleiten oder sie von der Indexierung ausschließen, was man eventuell nicht jedem Autor erlauben sollte.

Webmaster Tool Integration

An dieser Stelle bietet das Plugin vorgefertigte Felder für den Verifizierungscode von Google Webmaster Tools, Yahoo Site Explorer und Bing Webmaster Tools. Das Ausfüllen ist natürlich nur notwendig, wenn die Verifizierung nicht bereits erfolgt ist.

Plugin Dashboard von WordPress SEO

Titles & Metas

Dieser Funktionsbereich betrifft das Indexierungsmanagement und die Meta Angaben. Da in der Standard-Einstellung alle Artikel-Formate und Taxonomien indexiert werden, bekommt man an dieser Stelle die Möglichkeit bestimmte Inhalte auszuschließen. Außerdem kann man für alle Inhaltstypen „Fall-Back“-Templates für Title und Meta Description erstellen, was für größere Projekte sehr nützlich ist, oder wenn die individuellen Angaben nicht ausgefüllt wurden.

Generell

Einstellungen für den Titel

Das Häkchen zum Umschreiben der Titel sollte aktiv sein, damit die Titeleinstellungen des Plugins möglich werden.

Generelle Meta Einstellungen im Plugin

Seitenweite Meta-Einstellungen

Verhindern der Indexierung von Archiv-Unterseiten

Diese Funktion ist sehr nützlich, wenn man Kategorie-Seiten targeten möchte. Durch die Einstellung wird jeweils nur die erste Kategorie-Seite indexiert, wodurch zum einen Duplicate Content verhindert wird und zum anderen, dass Suchmaschinennutzer erst auf einer hinteren Kategorie-Seite einsteigen, beispielsweise auf /page/2.

Meta Keyword Tags

Von der Nutzung von Meta Keywords wird allgemein abgeraten, wer es dennoch verwenden möchte, kann es mit diesem Häkchen aktivieren.

Meta Robots Tag noodp und noydir

Mit den Robots Tags „noodp“ und „noydir“ verbietet man der Suchmaschine die Seitenbeschreibungen von DMOZ und dem Yahoo! Verzeichnis zu verwenden. Diese Einstellung gilt für die gesamte Seite.

Seitenweite Meta Einstellungen

Header Bereinigung

Durch einige der letzten WordPress Releases haben sich vermehrt Funktionen im Head Bereich angesammelt. Da Suchmaschinen einen sauberen Head bevorzugen, kann man an dieser Stelle einiges an unnützem Ballast loswerden. Diese Elemente auszublenden ist jedoch keine zwingend erforderliche Einstellung.
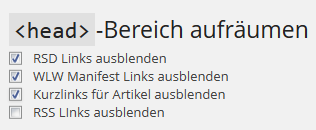
Einstellungen zur Header Bereinigung

Titles & Metas für Homepage, Artikel-Typen, Taxonomien und andere

Für alle Inhaltstypen können die folgenden Werte als Fall Backs festgelegt werden:

  • Title
  • Meta Descritpion
  • Meta Keywords (nur wenn man diese aktiviert hat)
  • Meta Robots
  • Ausblenden des Tags rel=“author“ (nur für Artikeltypen)
  • Anzeigen des Datums in der Snippet Vorschau (nur für Artikeltypen)
  • Ausblenden der WordPress Meta Box

Artikeltypen

Unter den Begriff Artikeltypen fallen in WordPress die folgenden Formate:

  • Posts
  • Pages
  • Medien
  • Custom Post Types (wenn welche angelegt wurden, wie z.B. Team Member oder Portfolio Items)
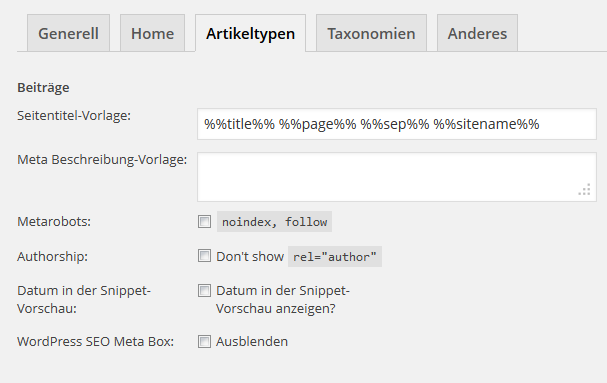
Plugin Einstellungen für Artikeltypen

Für jedes Format erhält man die gleiche Einstellungs-Box. Mit den Platzhalter Variablen kann man praktische Default Templates zusammensetzen.

Beispiel:
Platzhalter Title
%%title%% %%sep%% %%sitename%%
Umgewandelter Title
Ein Guide für das WordPress SEO Plugin von Yoast – AKM3 GmbH

Eine vollständige Liste der Variablen findet man hier.

Die eben besprochenen Platzhalter bieten auch die Möglichkeit Inhalte aus entsprechenden Custom Fields einzufügen. Um ein Custom Field anzusprechen, muss der Platzhalter folgendermaßen aufgebaut sein:

%%cf_%%

Generell sollte man aber Title und Meta Description über die WordPress SEO Box individuell eintragen.

Taxonomien

Unter den Begriff Taxonomien fallen:

  • Kategorien
  • Tags
  • Formatvorlagen
  • Custom Taxonomien (wenn welche angelegt wurden, wie z.B. Portfolio Übersicht)

Auch hier hat man die Möglichkeit die Einstellungen für jedes Format differenziert vorzunehmen.
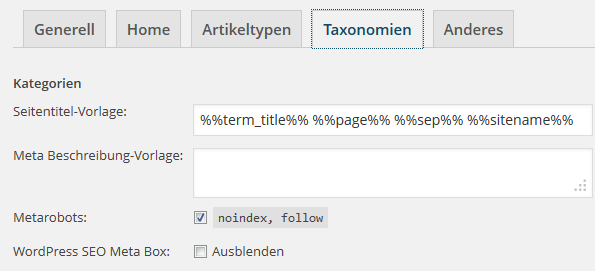
Plugin Einstellungen für Taxonomien

Gerade für Kategorie-Seiten ist es empfehlenswert Default Templates mit Variablen festzulegen, besonders wenn es sich um eine größere Website handelt. Jedoch kann man auch Taxonomien über die WordPress SEO Box individualisieren.

Durch die Indexierung von Taxonomie-Seiten entsteht im Normalfall Duplicate Content. Dieses Problem lässt sich durch individualisierten Content und den Einsatz von Excerpts zumindest teilweise beheben. Wenn die Taxonomie-Seiten nicht als Landingpages dienen, sollten diese von der Indexierung ausgeschlossen werden.

Anderes

Der Tab Anderes beinhaltet die Einstellungen für:

  • Autor-Archive
  • Datums-Archive
  • Suchseiten
  • 404-Seiten

Die Autoren-Archive und Datums-Archive werden in der Standardeinstellung von der Indexierung ausgeschlossen. Zusätzlich kann man diese Archive komplett deaktivieren.
Für die Suchseite und die 404-Seite kann man Platzhalter für den Titel festlegen, zum Beispiel: %%searchprase%% – %%sitename%%

Social

Facebook

Mithilfe dieses Häkchens kann man die wichtigsten Facebook Open Graph Meta Daten, wie beispielsweise Sprache, Title und URL im Head implementieren.
Facebook Open Graph Integration

Darüber hinaus besteht die Möglichkeit durch das Hinzufügen eines Facebook Admins oder einer Facebook Seite die Statistiken der Facebook Insights direkt in das WordPress Backend zu implementieren.

Um die Share Funktion von Facebook zu verbessern, können außerdem Default-Werte für die Homepage und andere Seiten hinterlegt werden. Sollte jemand die Homepage auf Facebook teilen, werden über die Open Graph Funktion das hinterlegte Bild und die vordefinierte Websitebeschreibung ausgegeben.

Twitter

Für Twitter gibt es keine umfangreichen Einstellungsmöglichkeiten. Es besteht lediglich die Möglichkeit Twitter Cards zu integrieren.
Twitter Cards Integration

Google+

Im Google+ Tab sollte man klar zwischen Google+ Author und Google+ Publisher trennen. Der Author ist der Nutzer, der für den rel=“author“ Tag verwendet werden soll. Dieser sollte auch in seinem Google+ Profil auf die Seite zurückverlinken.

Als Google+ Publisher kann man die URL einer Google Publisher Page hinterlegen.

Zum Beispiel könnte Andre Google+ Author sein und die URL der Google+ Publisher Page das AKM3 Profil.
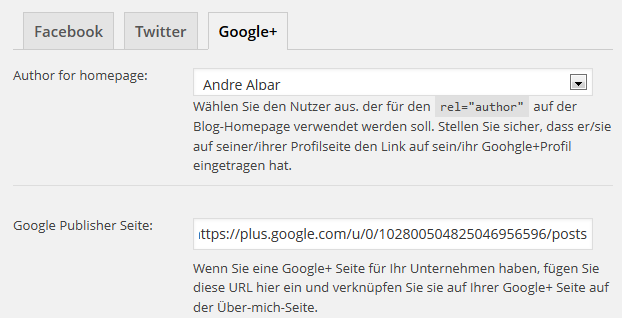
Google+ Einstellungen

XML Sitemaps

Um Google und anderen Suchmaschinen mitzuteilen, wenn sich etwas auf der Seite geändert hat oder es neue Inhalte gibt, kann man XML Sitemaps anlegen.

Sobald man die Funktion für die XML Sitemaps aktiviert, kann man mithilfe des WordPress SEO Plugins Sitemaps für Bilder, Artikel, Seiten und Custom Post Types erstellen und die gewünschten Suchmaschinen informieren. Yahoo! und Ask.com können ebenfalls angepingt werden.
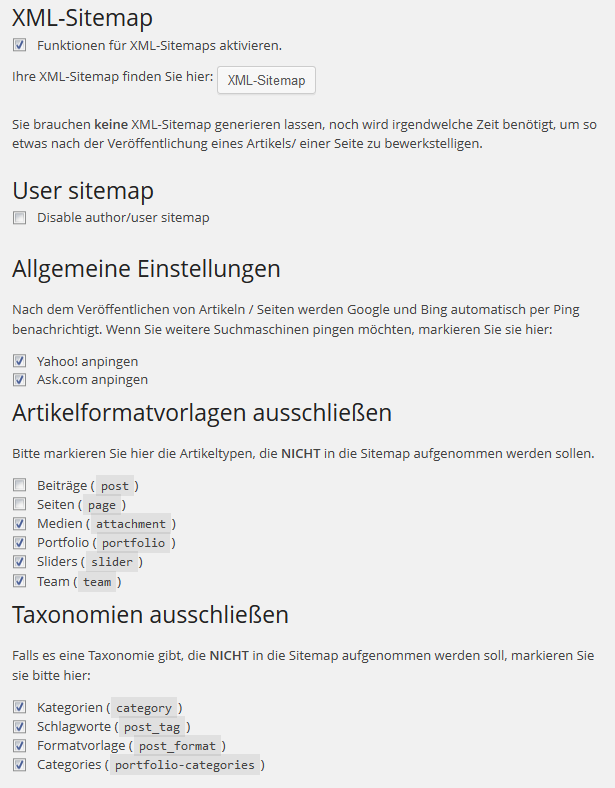
XML Sitemaps im Yoast Plugin

Die Einstellungen des Plugins bieten einige Vorteile im Vergleich zu anderen Sitemap Plugins. Artikelformate und Taxonomien können sehr leicht ausgeschlossen werden. Das Plugin erstellt Sub-Sitemaps für jeweils 1000 Posts, sodass die Suchmaschine bei einer Aktualisierung nur diese eine Sitemap holen muss. Große Websites werden dadurch weniger problematisch für den Crawler. Der dritte Vorteil ist das Styling der Sitemaps durch XLS Stylesheets. Dadurch werden sie leichter lesbar, und potenzielle Fehler können leichter erkannt werden.
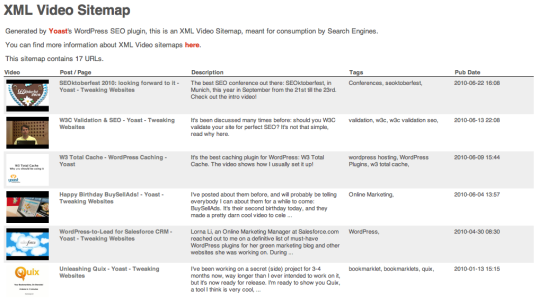
Sitemap mit XML Stylesheet

In den Permalink-Einstellungen des Plugins gibt es verschiedene Funktionen um die URLs zu manipulieren. Alle Funktionen sollten allerdings mit einer gewissen Vorsicht verwendet werden.

Generell sollte klar sein, dass diese Einstellungen nicht mehr geändert werden sollten, nachdem die Seite live ist oder für einwandfreie Weiterleitungen gesorgt wurde.

Permalink Einstellungen im Plugin

Die übliche Kategorie-Basis für WordPress lautet /category/. Der sich daraus ergebende Permalink ist wie folgt aufgebaut.

domain.com/category/eigentlicher-kategoriename

Wenn man WordPress als vollwertiges CMS nutzen möchte, bietet es sich an, Themenbereiche ohne die zwischengelagerte Kategorie-Basis anzulegen. Über das Plugin lässt sich diese leicht entfernen.

Darüber hinaus gibt es weitere URL Funktionen, wie das Erzwingen eines Backslashes oder die automatisierte Entfernung von Stoppwörtern.

Unter der Funktion Interne Links verbergen sich die Einstellungen für die Breadcrumbs. Diese können mithilfe eines Code Snippets in das eigene Theme integriert werden.
Interne Links mit Breadcrumbs
Im Backend können die Breadcrumbs dann aktiviert und definiert werden. Möglich sind verschiedene Präfixe und Trennzeichen für unterschiedliche Artikeltypen oder Taxonomien.

RSS

Um nicht von Scrapern in den SERPs verdrängt zu werden, bietet das Plugin einige Möglichkeiten der RSS Optimierung. Mithilfe von Variablen platziert das Plugin vor oder nach dem RSS-Feed Eintrag einen Link zum Original-Artikel, sodass die Scraper die Rankings sogar unterstützen können.

Nachtrag aus den Kommentaren von Michael: Auch wenn man mit den Links einen Verweis auf das Original setzt, sollte man vorsichtig sein, damit das Backlink Profil nicht nur aus billigen Scraper Seiten besteht. Ob diese Funktion mit einem Risiko verbunden ist, sollte man indiviuell und je nach Branche abschätzen.
RSS Links mit Parametern

Mögliche Variablen sind:

Variable Linkziel Anchor Text
%%authorlink%% Autor Archiv Autor Name
%%postlink%% Artikel Artikel Name
%%bloglink%% Blog Blog Name
%%blogdesclink%% Blog Blog Name und Slogan

Import & Export

Das WordPress SEO Plugin bietet die Möglichkeit alle Einstellungen zu exportieren und zu importieren. Das funktioniert auch mit älteren Plugins wie All in One SEO Pack, HeadSpace2, Robots Meta und RSS Footer, was besonders bei größeren Projekten eine enorme Zeitersparnis bedeutet.

Mit der Export Funktion lässt sich die Konfigurationsdatei auf andere Projekt übertragen, sodass man nicht alle Funktionen erneut einstellen muss.
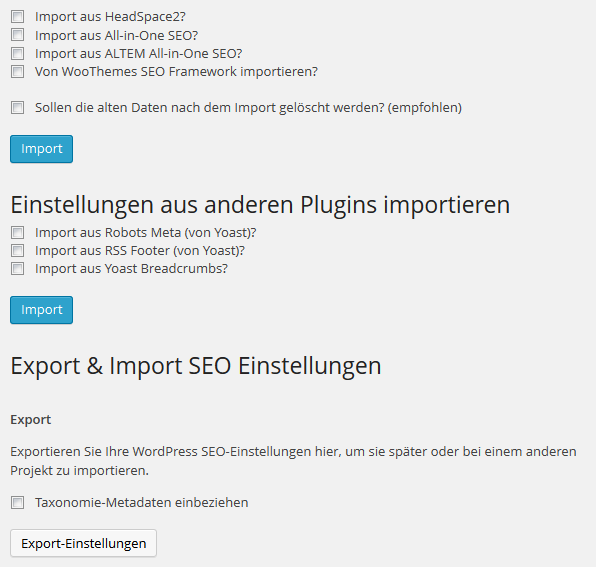
Export Import Funktionen

Dateien editieren

In diesem Bereich des Plugins kann man direkt über die WordPress Installation die .htacces und die robots.txt editieren, was besonders praktisch ist, wenn man keinen Server-Zugriff hat.

WordPress SEO Box

Die WordPress SEO Box ist ein Element, um direkt auf einzelnen Seiten individuelle Einstellungen vorzunehmen. Sie ist auf allen Formatvorlagen verfügbar, sodass man sie nicht nur unter Artikeln und statischen Seiten findet, sondern auch in Taxonomien.

Die Box besteht aus den 4 Tabs:

  • Generell
  • Seiten Analyse
  • Erweitert
  • Social

Generell

Im generellen Teil kann man Title und Meta Description individualisieren und mithilfe der SERPs Snippet Preview herausfinden, ob beides relevant, passend und lang genug ist, und somit die Click Through Rate verbessern. Wenn die Felder nicht ausgefüllt werden, greift das Plugin auf die seitenübergreifenden Fall Back Einstellungen mit den vordefinierten Parametern zurück.

Darüber hinaus kann man ein Fokus Keyword festlegen, welches als Basis für die Seiten-Analyse dient. Das Fokus Keyword ist nicht zu verwechseln mit den Meta Keyword Tags. Es fasst lediglich das Thema der Seite in einem Begriff zusammen. Beim Tippen des Fokus Keywords werden passende Vorschläge geladen, die identisch zu Google Suggest sind.
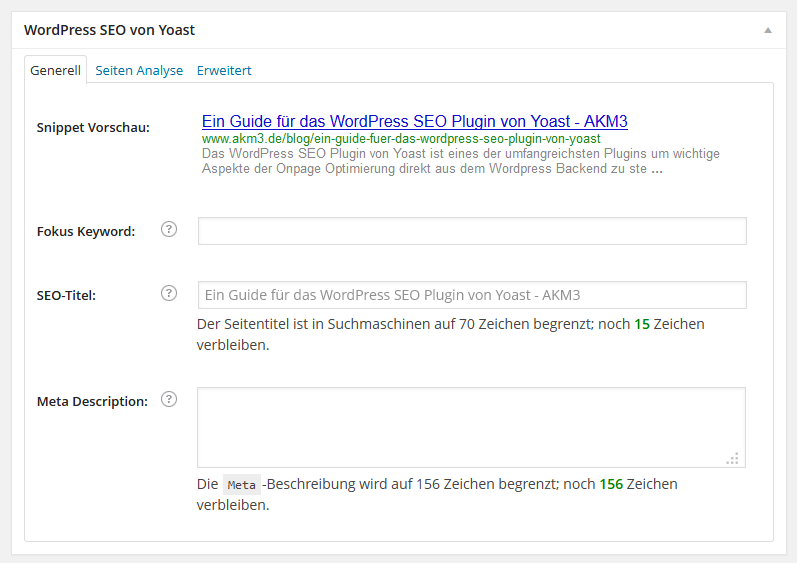
Genereller Tab der SEO Box

Seiten Analyse

Diese Funktion ist eine Zusammenarbeit von Yoast und Linkdex. Basierend auf dem Fokus-Keyword werden Onpage-Faktoren analysiert und als Handlungsempfehlung ausgegeben. Beispielsweise wird ermittelt, ob Bilder integriert wurden, der Beitrag lang genug ist oder ob das Fokus-Keyword vorhanden ist.
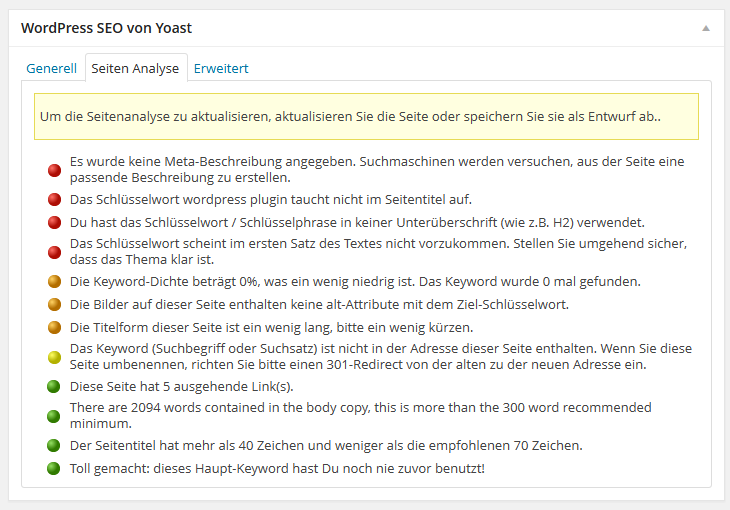
Seitenanalyse Tab im Plugin

Erweitert

Dieser Tab ist im Wesentlichen der Funktionsbereich, der dieses Plugin so mächtig macht. Er ermöglicht die folgenden individualisierten Einstellungen auf der Ebene einzelner Artikelformate und Taxonomien:

  • Meta Robots Index: index/ noindex
  • Meta Robots Follow: follow/ nofollow
  • Einbindung in die Sitemap: ja/ nein
  • Priorisierung innerhalb der Sitemap: 0,1 bis 1
  • 301-Weiterleitungen
  • Canonical URL: Beim Aktivieren des Plugins werden automatisch Canonical Links für alle Artikel und Seiten integriert. In der SEO Box kann man die Canonical URL leicht anpassen, und auch Cross Domain Canonicals werden unterstützt. Innerhalb von paginierten Archivseiten wird Gebrauch von rel=”next” und rel=”prev” gemacht, was von Google explizit empfohlen wird.
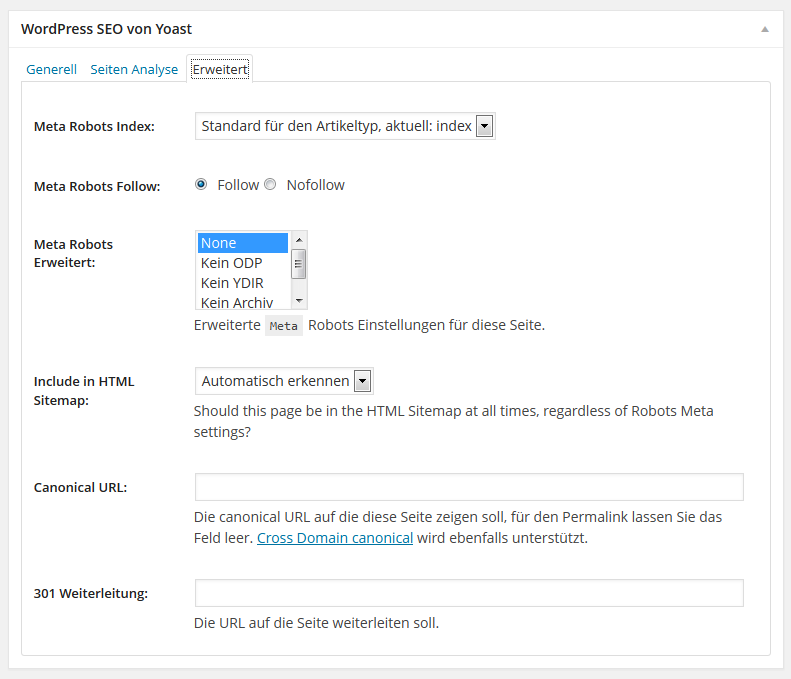
Erweiterter Tab der SEO Box

Social

Im Social Tab ist es möglich eine individuelle Beschreibung für Facebook und Google+ über den OpenGraph im Head hinzuzufügen. Für Facebook kann sogar ein extra Bild hinterlegt werden, was besonders bei schwierigen Bild-Formaten innerhalb von Artikeln oder bei Sonderaktionen nützlich ist.
Social Tab der SEO Box

Premium Plugin

Die Premium Version erweitert das Plugin um zwei Funktionen, die gut miteinander verknüpft werden.

Google Webmaster Integration

Mithilfe der Google Webmaster Integration kann man sich im Backend eine Liste der aktuellen Crawling Fehler erstellen lassen und diese dann schnell beheben. Genau wie beim Broken Link Checker Plugin kann man direkt die neue URL für die Weiterleitung eintragen.
Google Webmaster Tool Integration

Redirect Manager

In diesem Teil des Plugins kann man einzelne Weiterleitungen verwalten. Über ein Interface, das stark an das Redirections Plugin erinnert, kann man neue Weiterleitungen eintragen, welche über die Datenbank abgefragt werden.

Die zweite und wesentlich interessantere Möglichkeit ist, sich über das Plugin eine neue Datei erstellen zu lassen, welche man in die Server Config oder sogar in die .htaccess importieren kann. Da diese Abfrage der Datenbank vorgelagert ist, lädt diese Variant wesentlich schneller, gerade bei großen Seiten, die mit der Zeit immer mehr Umleitungen erfordern. Besonders vorteilhaft ist, dass man trotzdem das übliche WordPress Interface zur Verwaltung nutzen kann.
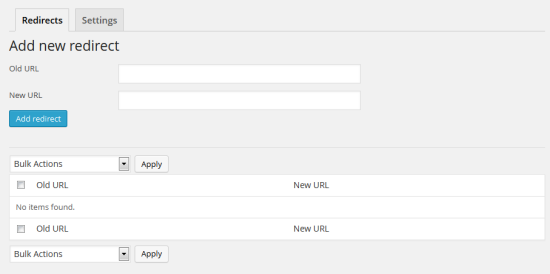
Redirect Manager von Yoast
Welche Erfahrungen habt ihr bisher mit dem Plugin gesammelt? Gebt bitte über die Kommentare Bescheid, wenn ihr Anmerkungen oder Fragen habt!

Über die Premium Erweiterung hinaus gibt es noch die folgenden spezielleren Erweiterungen:

Kostenlose Erweiterung

Premium Erweiterungen


14 Jun

Learndash Tutorial

https://managewp.com/learndash


LearnDash by Justin Ferriman

Biggest marketplace advantage: This plugin has more features than its competitors mentioned in this article. It is also built by a person who has a background in the e-learning space, which explains why it is so feature-rich and suitable for a wide variety of educational needs.

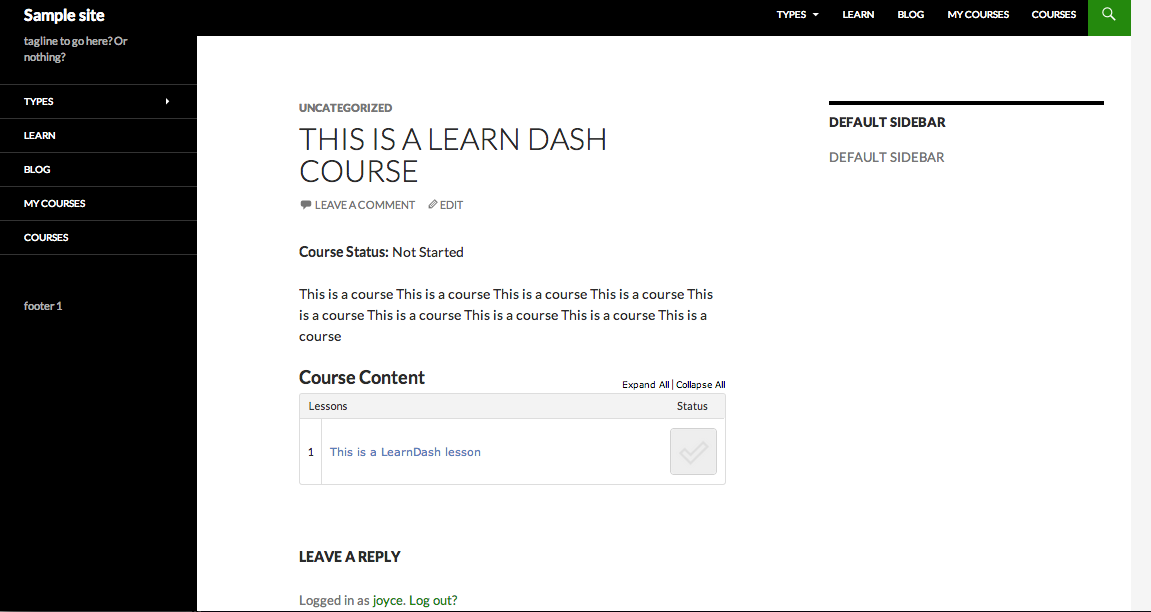
This plugin also integrates the most seamlessly with any theme because it mostly uses Custom Post Types to display content.

It also has an extensive list of integrations it offers, all of which are free. These range from e-commerce to membership plugins, badge features and other developer tools such as those that help with Tin-Can API reporting.

Summary: Though it launched later than WP Courseware and Sensei, this plugin seems to have advanced its list of features and functionality. I was amazed when I first saw how much it could do. However, with more functionality comes the very difficult task of designing the user interface and learnability of a software, which is where this plugin’s weak point lies (but Justin told me, they’re working on it).

logos of organizations using learndash course management software

LearnDash Features:

Structure, Controls and Interface:

In LearnDash you have 4 separate Custom Post Types: Courses, Lessons, Quizzes and Certificates.

In addition to the above, you also have an “Advanced Quiz” area, which is separated from its plugin counterparts and shown at the bottom of the WordPress dashboard.

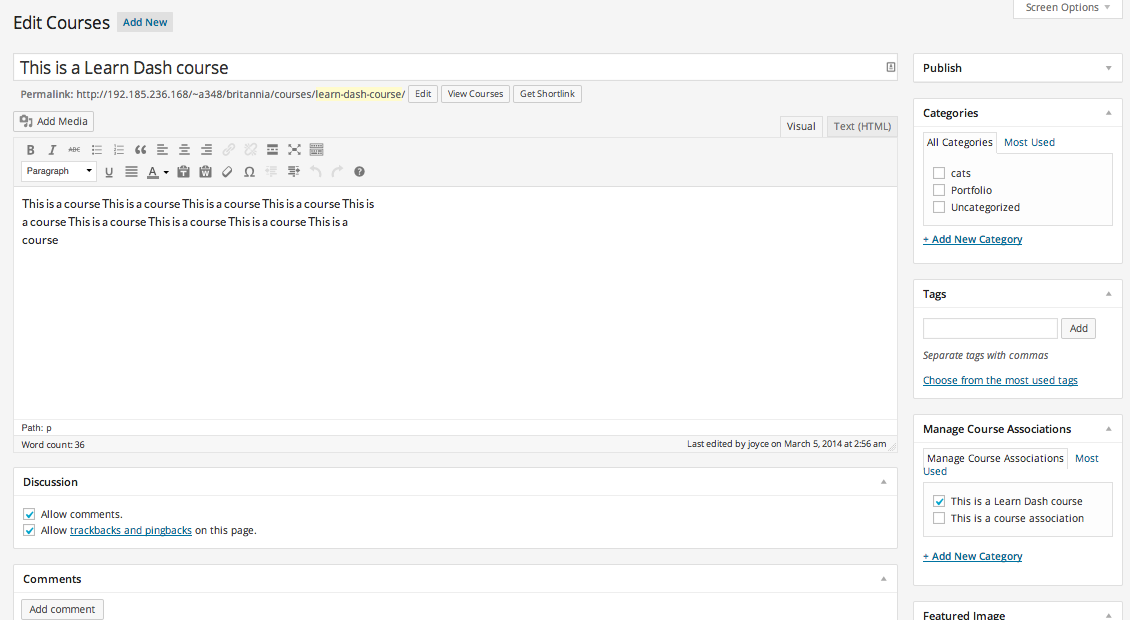
Since the plugin uses Custom Post Types, the editing area for entering Course and Lesson content looks exactly like the regular WordPress editing screen, with almost all the same controls, including Featured Image.

learndash-edit-course-page


learndash-seamless-theme-integration

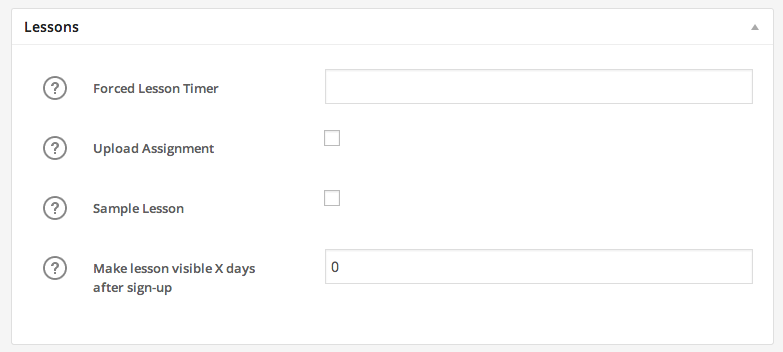
Lessons can have timers, or the option to be visible a certain number of days after a user signs up. They can also accept assignment uploads.

This plugin allows a Lesson to be set as a “sample” so people can try a few before committing to buy the entire Course.

learndash-lesson-single-field-options

Lessons can be forced to be taken in a certain order, or be taken randomly.

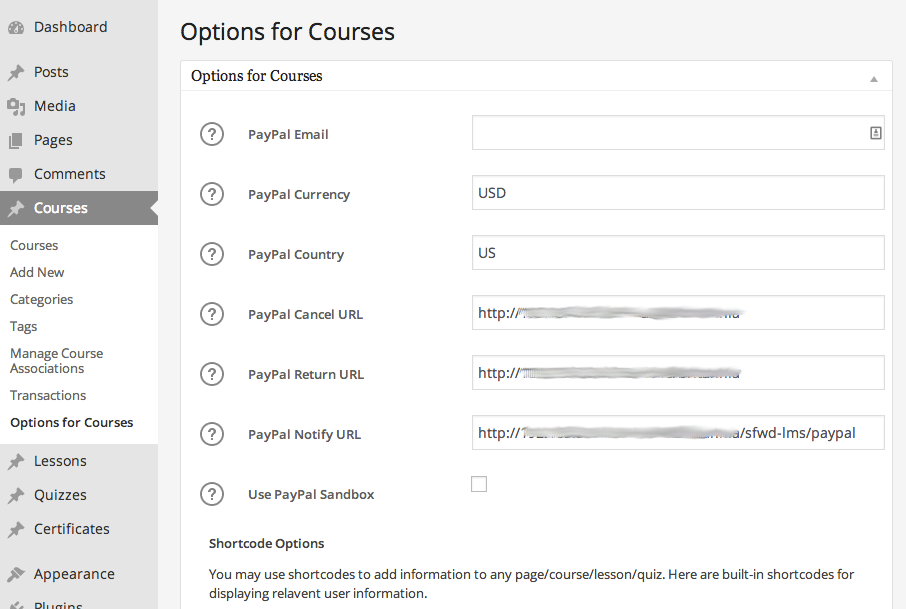
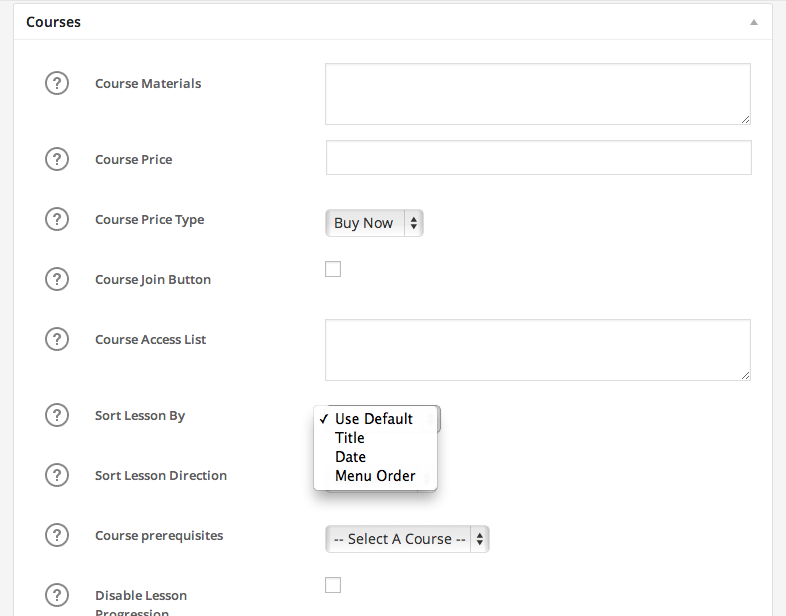
Courses can have prerequisites, can be free or paid and can be based on recurring or one-time payments. (Paypal integration is automatically set up with this plugin to allow for payment options with Courses).

learndash-options-payment-settings

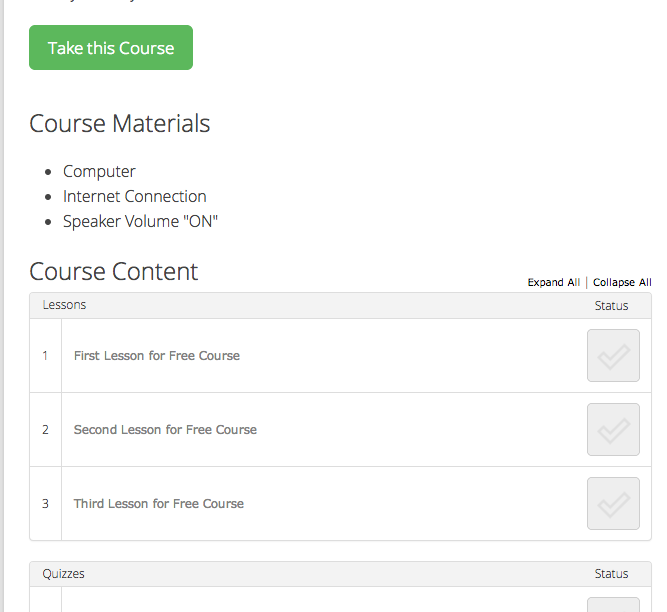
Courses have a “Course Materials” field to enter items that users will need to take the course (such as pre-purchased books, computer or software requirements, and so on).

learndash-course-single-edit-fields


learndash-course-materials-front-end

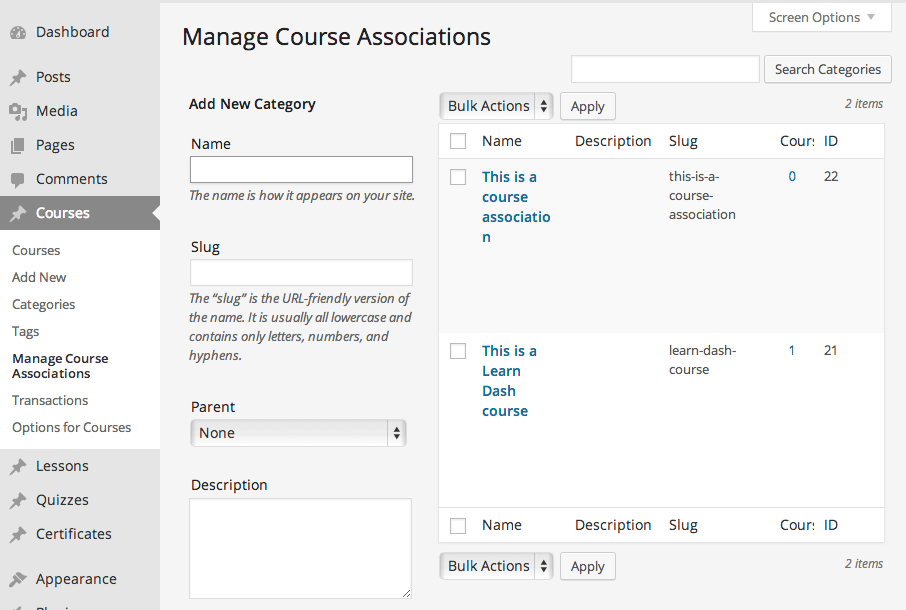
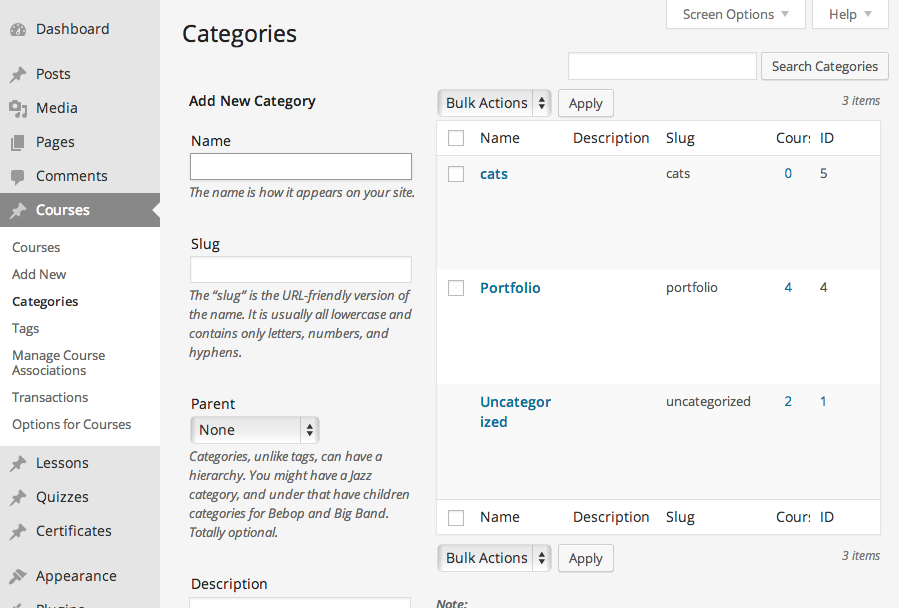
Courses and Lessons can have “Associations,” or regular categories and tags for organization. This is very confusing at first because Course titles automatically become Course Associations and the purpose of the additional Associations taxonomy is not that clear. However, as Justin, the creator explained to me, using Associations will make sure a Lesson is part of a particular Course (or more than one Course), and likewise with Quizzes. The categories and tags are for helping you organize the display of the Course listings on the front end of your website, much like using Post categories and tags.

A course title became an "Association" by default.


Course categories and blog categories are identical.

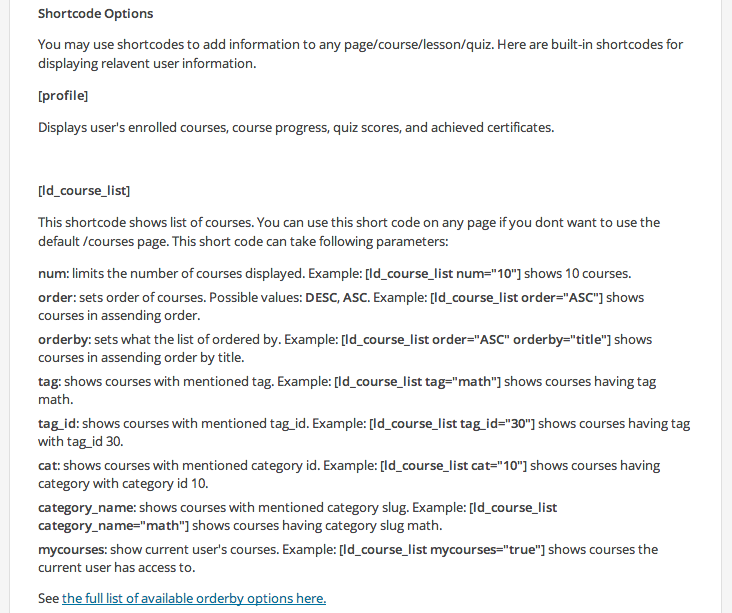
Shortcodes can be used to display Course categories or tags. Shortcodes can also be used to show a list of quizzes, payment buttons, groups, or ‘visitor’ content for those not yet enrolled in the course, plus more.

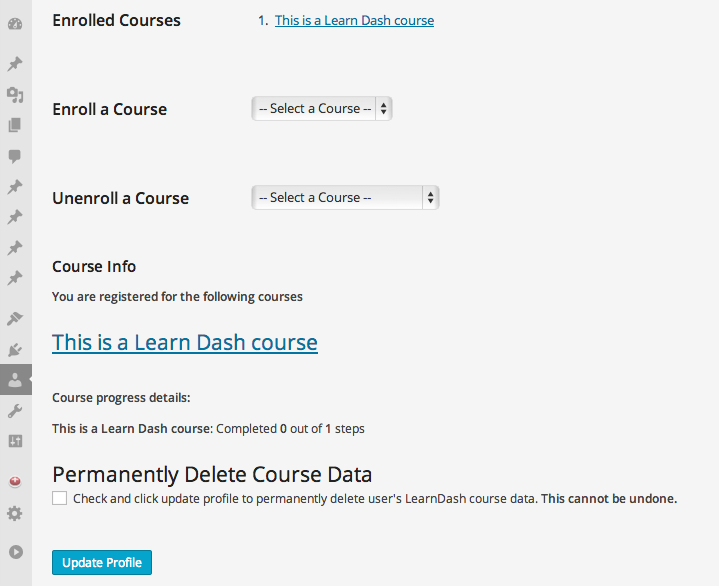
Users can be manually added or removed from a course using the regular WordPress Users menu, since all students are basically ‘Subscribers’ with LearnDash. They can also be part of a “Group,” for which there is a custom user role called Group Leader. This user role allows a teacher to review the scores and progress of students in their Group.

learndash-user-enrollment-profile


learndash-group-leader-role

You can bulk add or remove users to a Course.

Quizzes and marking:

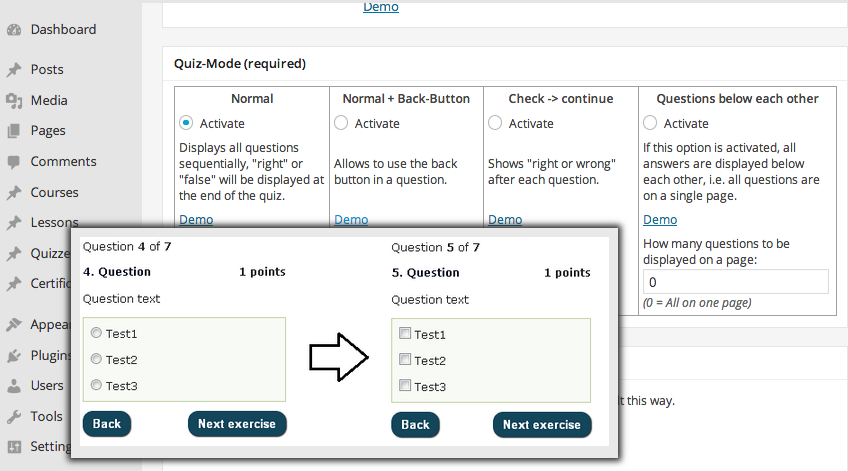
There are two types of Quizzes in LearnDash: the ‘simple’ Quiz, or the Advanced Quiz. Both are separate menu items. Learning the difference between the two, or the reason why two of them exist is very confusing.

The Advanced Quiz has a lot of functionality and settings options. However it is very difficult to intuitively figure out how to create and use an Advanced Quiz, get it to display on the front end of WordPress, or connect it to a Course or Lesson. However, a little nudging through the interface will get you through the hurdles soon enough, and when it does, you’ll have lots of options.

learndash-extensive-quiz-options-2


learndash-extensive-quiz-options

In general, here are Quiz capabilities with LearnDash:

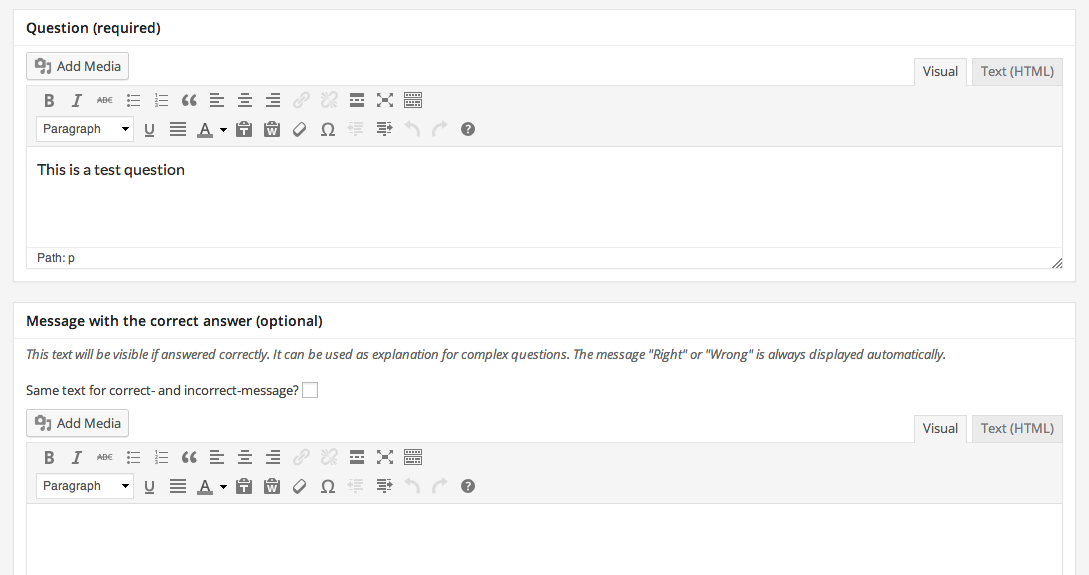
Quiz questions use an editing box that is similar to the Post and Page editor, where you can enter formatted text, links, images and other files.

learndash-using-wp-editor-quiz-questions

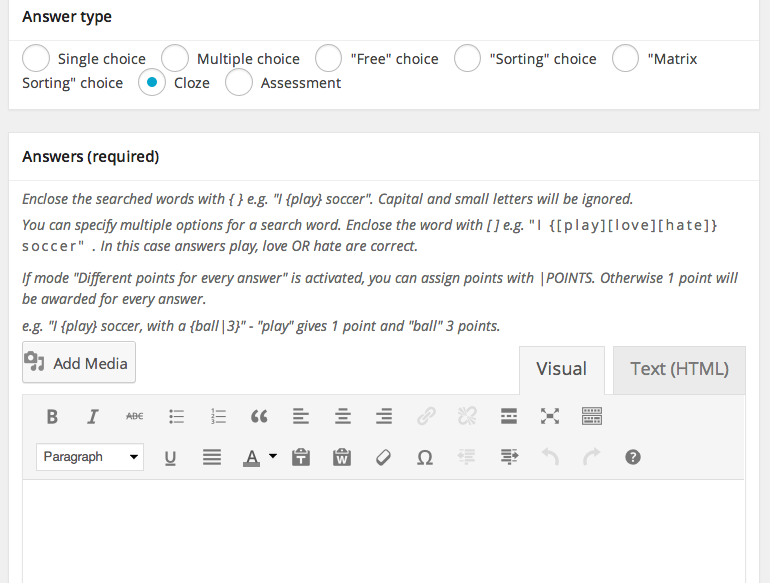
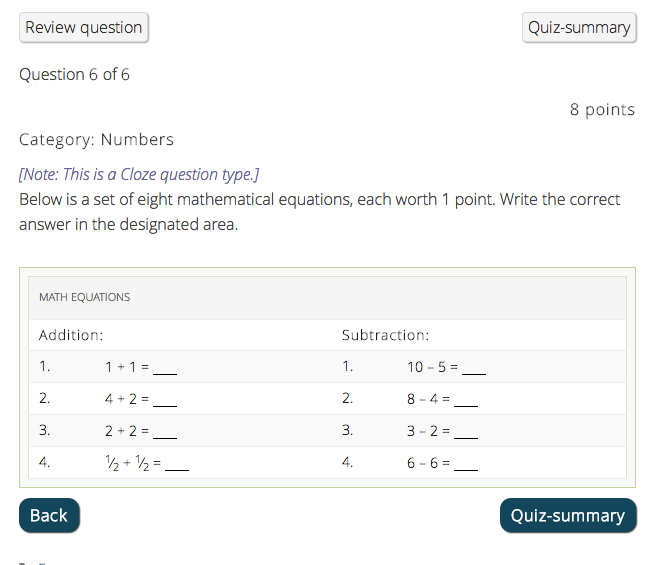
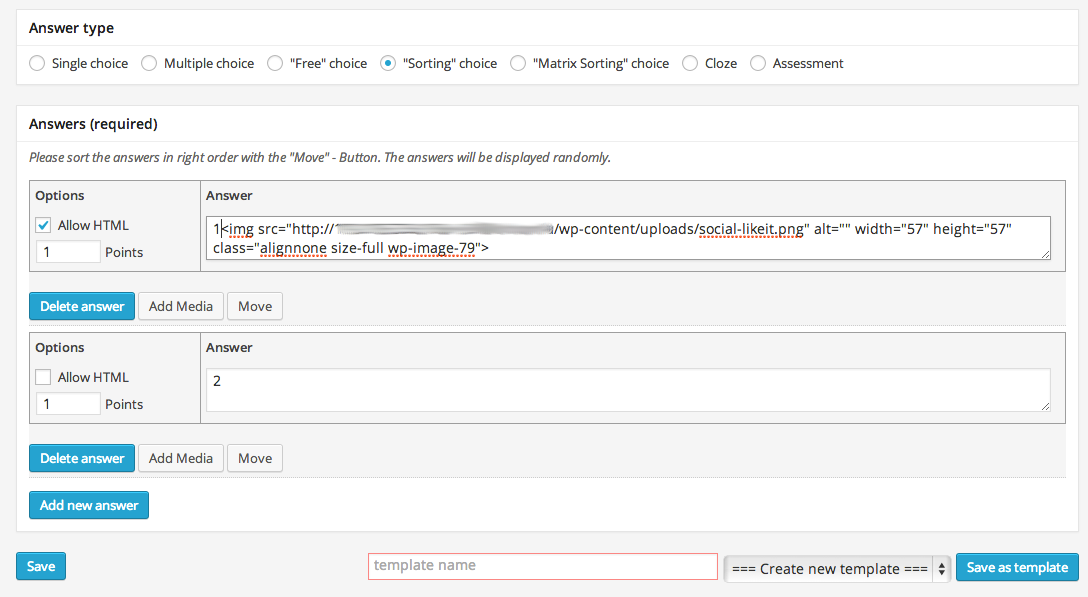
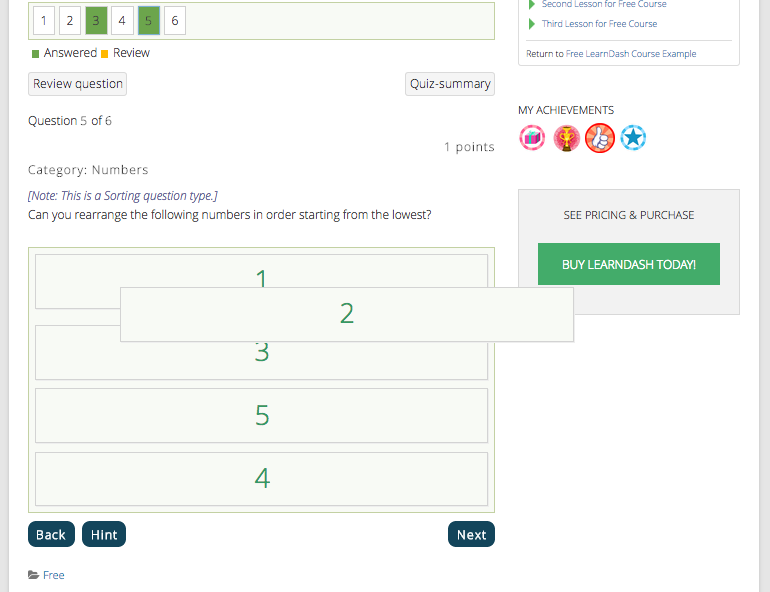
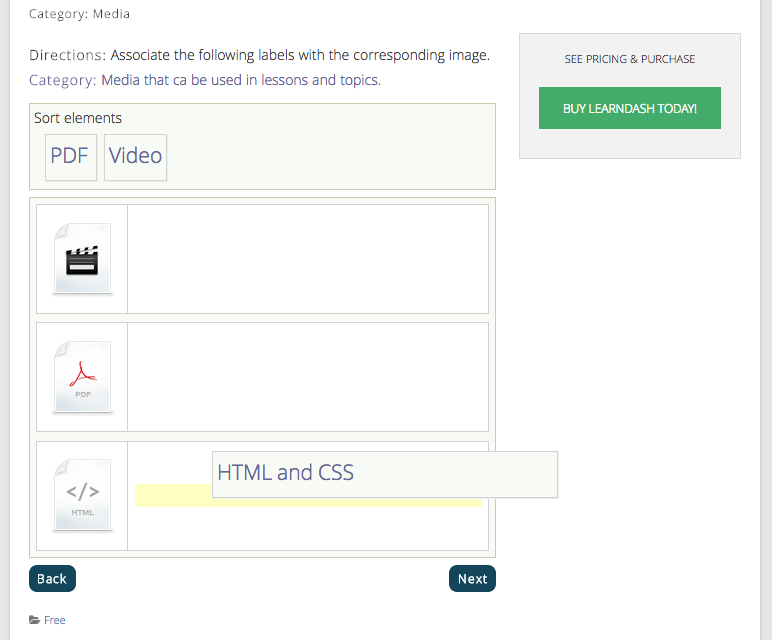
Questions in Quizzes can require the following types of answers: Single choice, Multiple choice, “Free” choice, Sorting choice, Matrix Sorting choice, Cloze or Assessment. Although they have confusing names and are even more confusing to set up, they are actually common question types that we are used to. For example “Cloze” questions are basically fill-in-the-blank questions (except explained in a more complicated way). The most unique question offering in this plugin is the sorting option, which asks users to match up words or pictures, or put them in the correct order.

learndash-confusing-cloze-question


learndash-cloze-quiz


learndash-sorting-quiz-question-template


learndash-sorting-question


Quizzes can have intro text (such as instructions) as well text to be displayed after results are shown.

You can set the number of times a Quiz can be repeated. Advanced Quizzes can opt to have a “Restart” link and or be set to only allow one take.

learndash-simple-quiz-fields

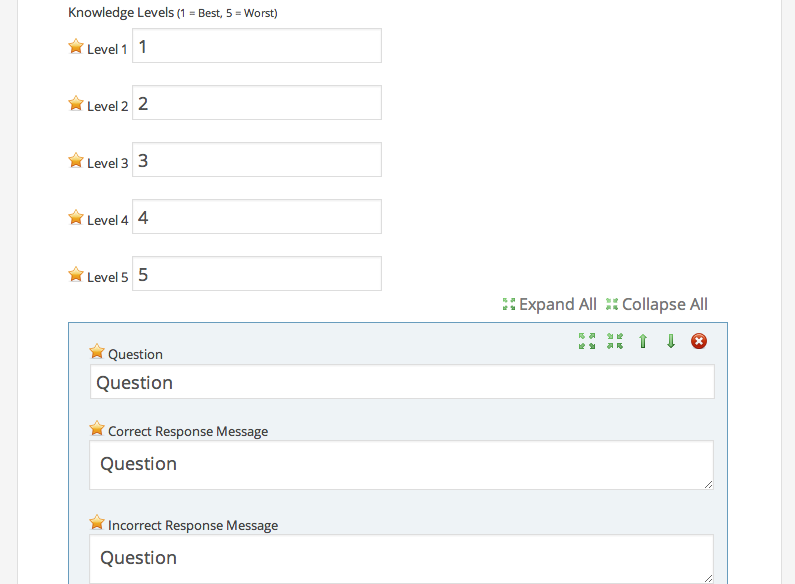
Quizzes have knowledge levels, which rate a user on a scale of 1 to 5 (such as being able to say they are an “Expert” level learner, though this is not part of the passing mark.

learndash-quiz-knowledge-levels-fields-simple

Questions and answers within questions can be moved up or down to change their order using simple buttons or a drag and drop feature in the Advanced Quiz area.

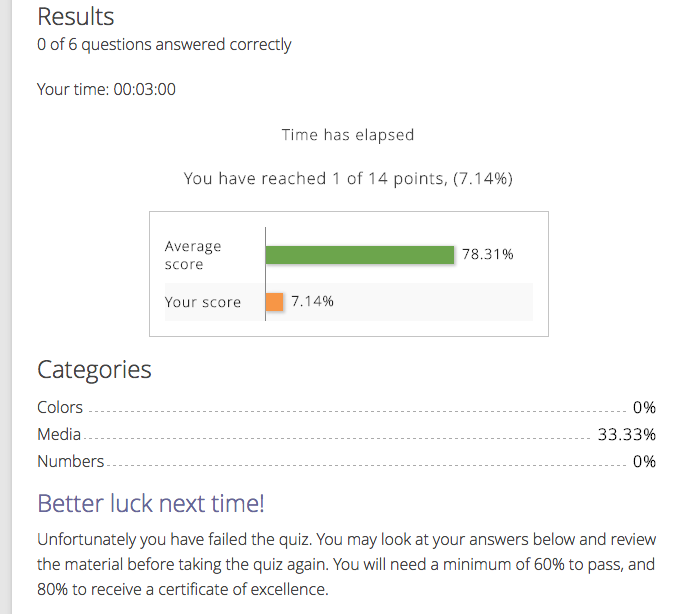
Advanced Quiz questions can have categories, which work with random question sorting. As Justin explains, “From a teacher stand point, categories allow them to see if there is a specific category where a student struggled most and can spend more time on that topic.”

learndash-results-categories-quiz

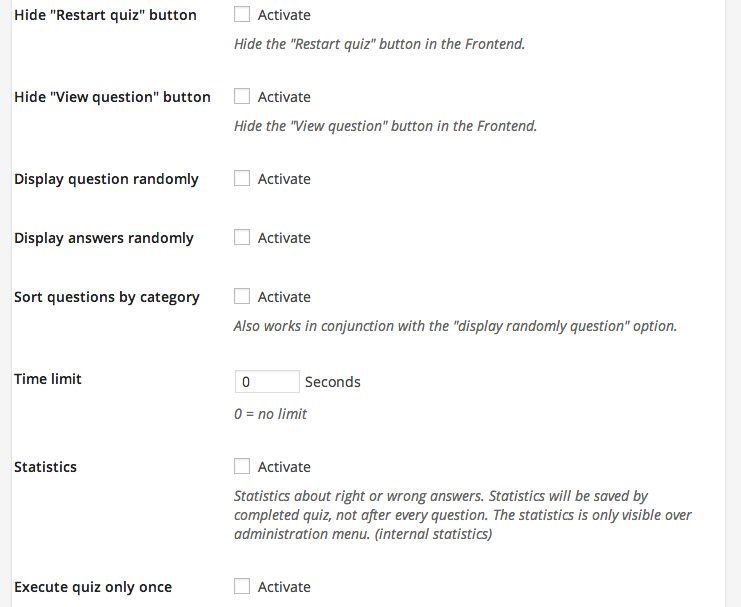
Advanced Quizzes can have time limits and can start automatically when a page loads.

Advanced Quizzes can have overview areas that show a user how many questions they’ve seen, answered and have left to go. It also allows skipping a question and coming back to it later.

Quizzes can have both random questions and random answers. This means the correct answer can be option “B” in one user’s Quiz, while being option “A” in another user’s Quiz. In addition, the Quiz can show only a certain number of random questions from a set, to help randomize Quizzes for each user even more.

learndash-advanced-quiz-settings-1

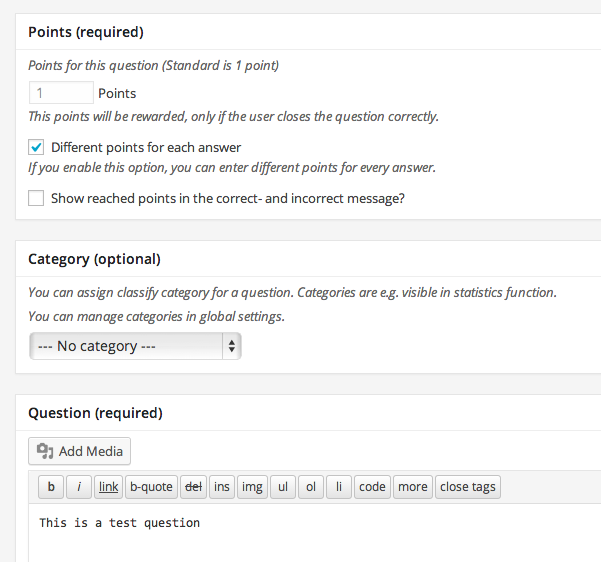
Questions can have a number of points assigned to them. This is great for teachers who want to assign more weight to one question over another. Not only that, each answer can have different points assigned to it, so with multiple choice, the ‘best’ answer can have more points, but a ‘good’ answer can have less, still allowing credit for effort.

learndash-points-cat-quest-quiz-advanced

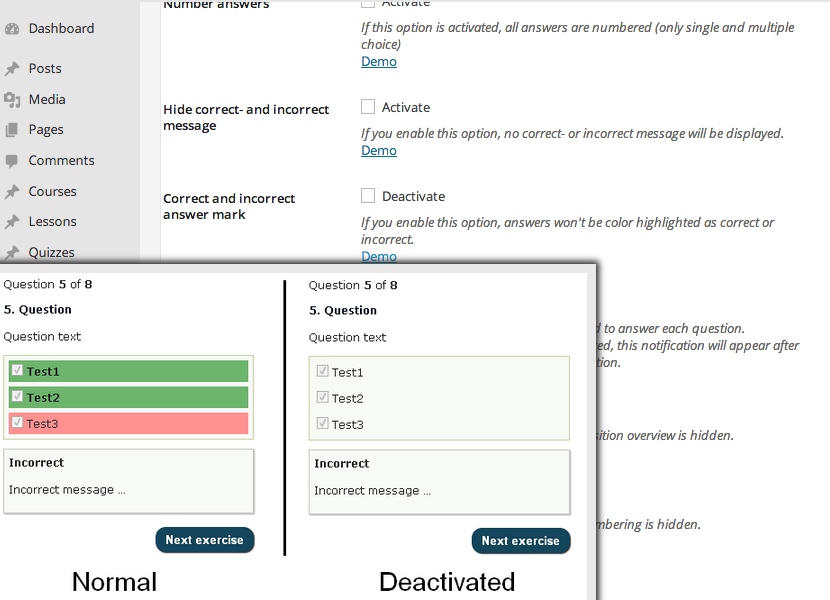
There are options to either show or not show a user if they got a question correct, or show the correct answer. You can also opt to either show or not show a user how they did overall. You can give a user a message or explanation after getting an answer correct or incorrect.

Questions can have “hints” which use a regular WordPress-type editor with all formatting capabilities.

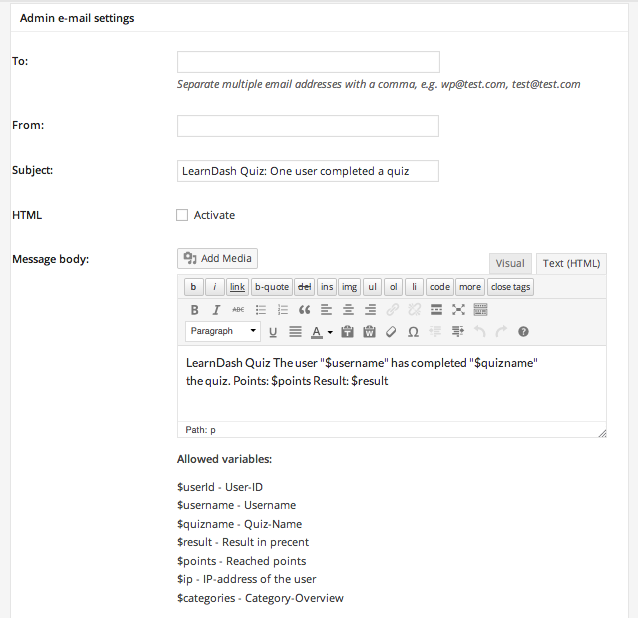
Advanced Quizzes can optionally have e-mails sent automatically to users with results.

learndash-admin-quiz-email-settings

You can show statistics and average marks to users.

There is a Leaderboard option where students can publicly display their scores. The back end Statistics and Leaderboard area can sort through users to see their performance on a Quiz.

learndash-advanced-quiz-list-screen

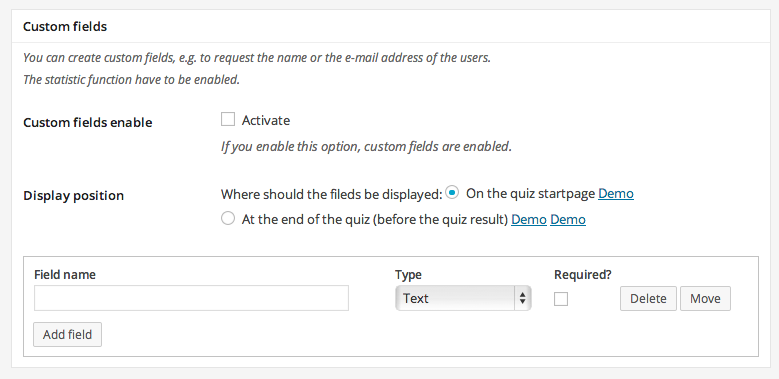
There are options to require users fill in a form with information before beginning a quiz (this is useful for entering things like student ID numbers at universities, or allowing the teacher to see the phone number, name and e-mail address right on the Quiz at a glance, like on traditional tests).

learndash-custom-fields-quiz-info-before

Advanced Quizzes and Questions can be templated for easy reproduction (see above screenshot).

Questions can be copied from other Quizzes.

Advanced Quizzes can be inserted into any Page or Post using a shortcode or by using a dropdown option in the “Quizzes” Custom Post Type.

Certificates:

Each Course can have different certificates designed for it. A Quiz can be associated with a specific Certificate.

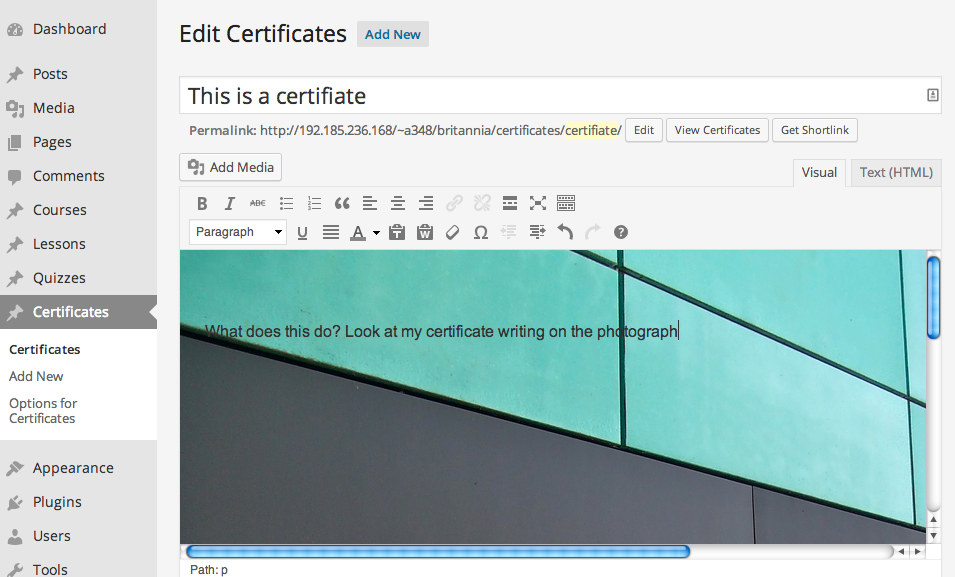
The way Certificates are added is through the Featured Image function in WordPress. From there you can enter text into the text editor, where the Featured Image is shown as a background. This can get tricky for ensuring proper alignment.

learndash-certificate-single-editing

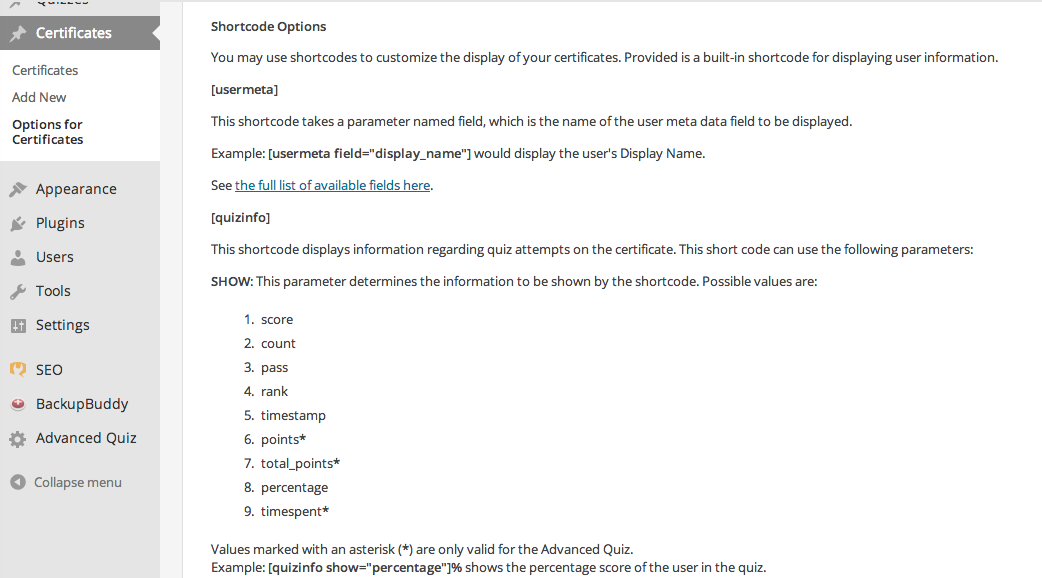
Justin explains that, “the certificate creation can take on many user meta data, which is only generated for the user to see and admin to access.”

learndash-certificate-shortcode-options

Certificates are available for download after completing a Quiz, or in a user’s profile page.

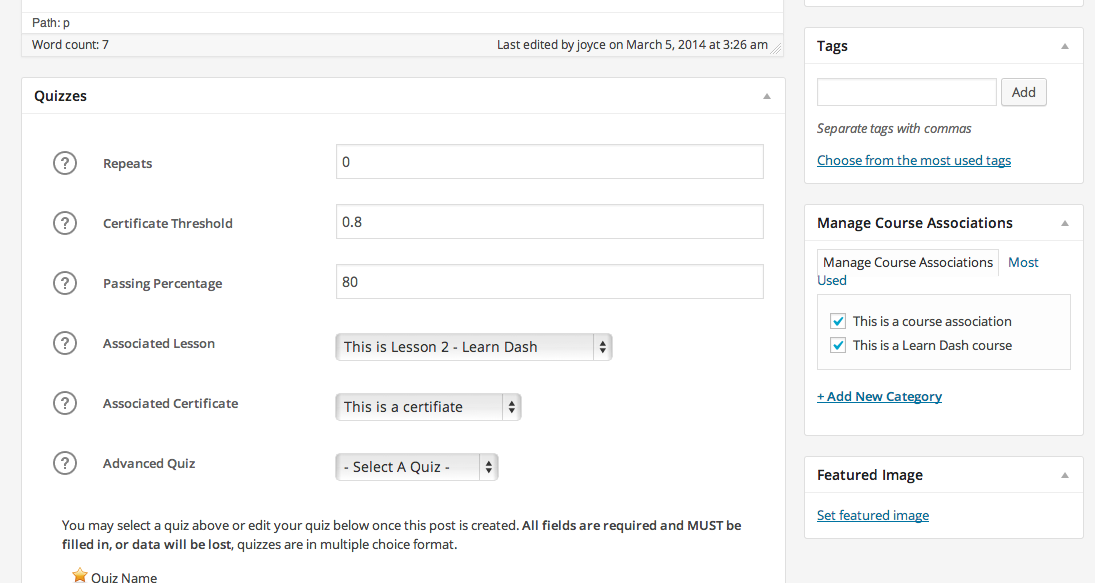
You can set a passing mark for a user to get a Certificate. You can then have a separate “Passing Percentage.”

Development Needs:

There are very little development needs with this plugin when it comes to displaying content on the front end of an existing WordPress website. The way it’s set up makes it extremely easy to fit into any theme, because its contents are contained within the theme’s ‘regular’ templates by using Custom Post Types.

In some cases it is useful to know how to use shortcodes, or how to customize CSS to override default styles the plugin uses. The plugin has an extensive list of shortcode options and variations to control the display of customized content very easily.

Pitfalls:

There is no way for a user to upload a file as part of a Quiz question. This can be problematic for accepting essays or other types of long-form answers.

Creating some types of questions in the Advanced Quiz area can be difficult if you are not used to coding or logic (see above screenshots).

Sometimes there are so many features it is overwhelming to go through the set up of a Quiz. However, this is mainly a user interface problem that can be solved, since a difficult learning curve only needs to happen once.

At present, Post categories and tags automatically become Course categories and tags, which can make it difficult to differentiate your blog content from your Course content, or at least keep them separate for organizational purposes (see above screenshot).

The Certificates function is a bit awkward to work with (see above).

As mentioned above, the user interface and learning curve is the hardest part to deal with when using this plugin.

14 Jun

Sensei Tutorial

https://managewp.com/sensei


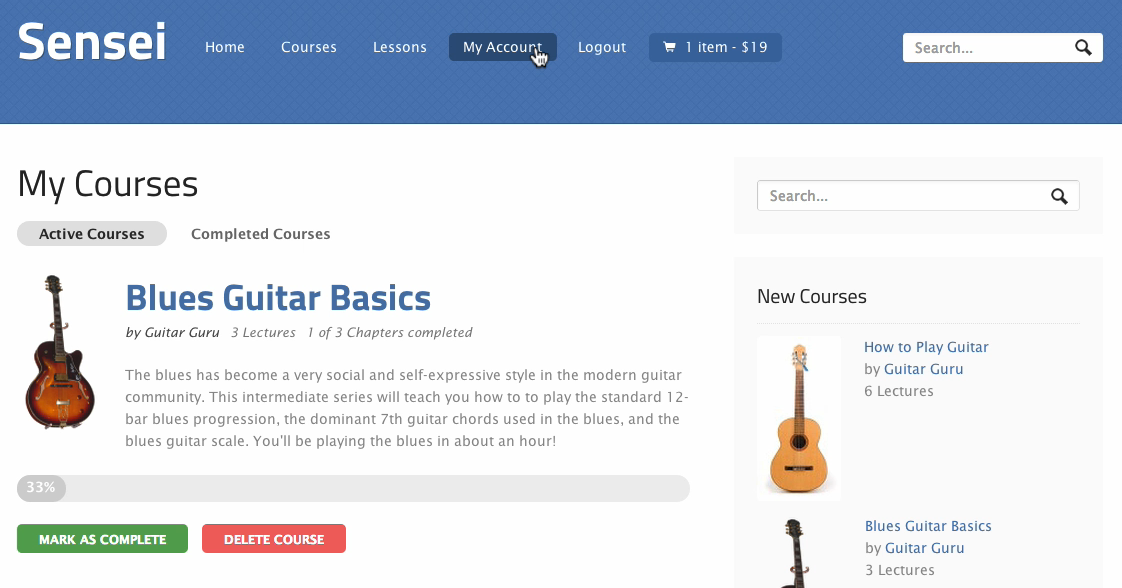
Sensei by WooThemes. You may know WooThemes for their popular WordPress template designs and their e-commerce plugin, WooCommerce. Well now that amazing team is working on an LMS plugin for WordPress as well. We tested their latest release of the plugin and also interviewed the lead developer on the project, Dan Johnson. Below are our findings, which we hope will help you chose the right option for your e-learning needs!

Sensei by WooThemes

Biggest marketplace advantage: This plugin’s core strength is that it integrates with a well-known and widely used theme marketplace (WooThemes) and e-commerce plugin (WooCommerce), for selling courses online. It also has the most ‘plug-and-play’ qualities with its back end user interface, meaning it is the easiest plugin to learn how to use.

Summary: Being one of the newest learning management systems, this plugin is slowly growing its feature set and is backed by a ‘big name’ brand in the premium WordPress space. This is an indicator that you can expect good support and future growth. However, at present, it is not as extensive as competing products.

Tom wrote about Sensei on the ManageWP blog last year. Sensei has extensions allowing you expand its possibilities. Albeit, there are only three right now. However, they are important to know about because when you compare the plugin to its competitors, these extensions ‘fill the gap’ with features you may be looking for: certificates, media attachments and modules.

sensei-guitar-courses-sample

Note: you can click on the screenshots below to enlarge them.

Sensei Features

Structure, Controls and Interface

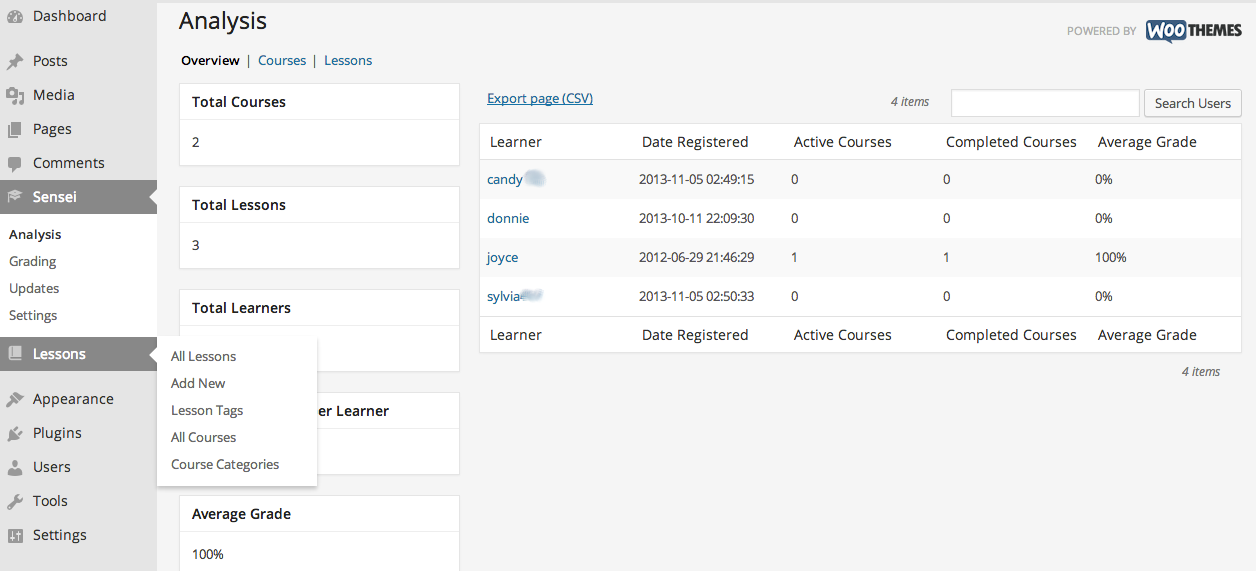
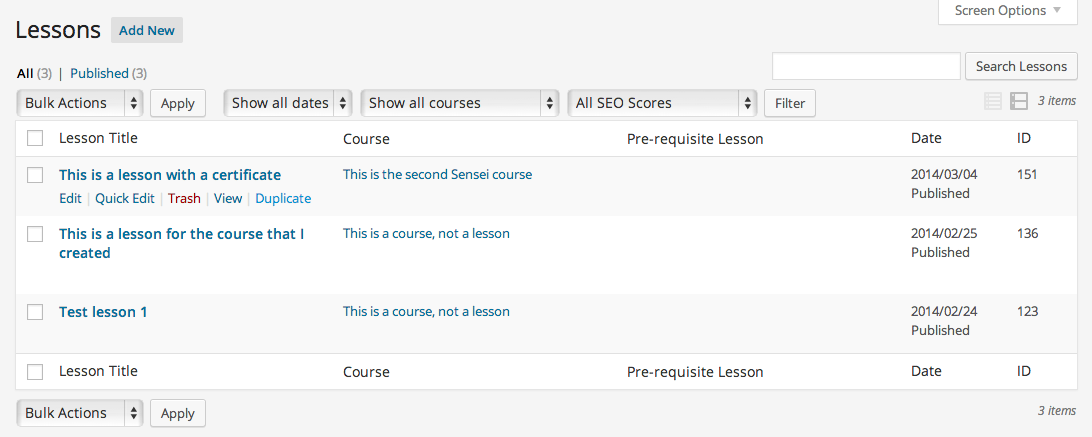
There are Courses and Lessons in Sensei. Lessons go inside Courses but you will mainly be working with Lessons, which is why it’s the most dominant menu item (“Courses” is a sub-menu item under “Lessons,” which makes the order confusing).

sensei-side-menu-and-overview sensei-lessons-list-screen

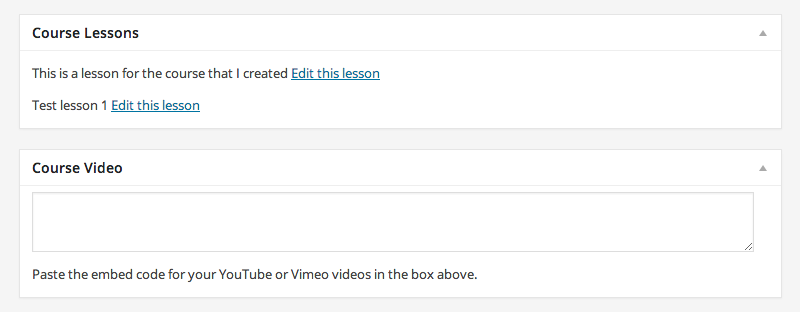
Each Course has a custom field for embedding a YouTube or Vimeo video. The Course video would theoretically be used to advertise the Course publicly or provide a sample lesson.

sensei-single-course-editing-fields

Each Lesson (which goes inside a Course – remember that) has a custom field allowing you to embed a video. Lesson videos would contain private instruction (see screenshot below).

If you want Lesson videos to be private, and not something someone can grab freely on the web, you need to use a paid service like Vimeo Plus, which allows specified rules for where videos can show on the web. Alternatively, you can self-host videos by clicking the WordPress “Add Media” button in a Lesson editor (though there are caveats with self-hosting video).

Courses can be “Featured.” A shortcode can be used to display “Featured” videos on a Page or Post in WordPress.

sensei-single-course-editing-screen

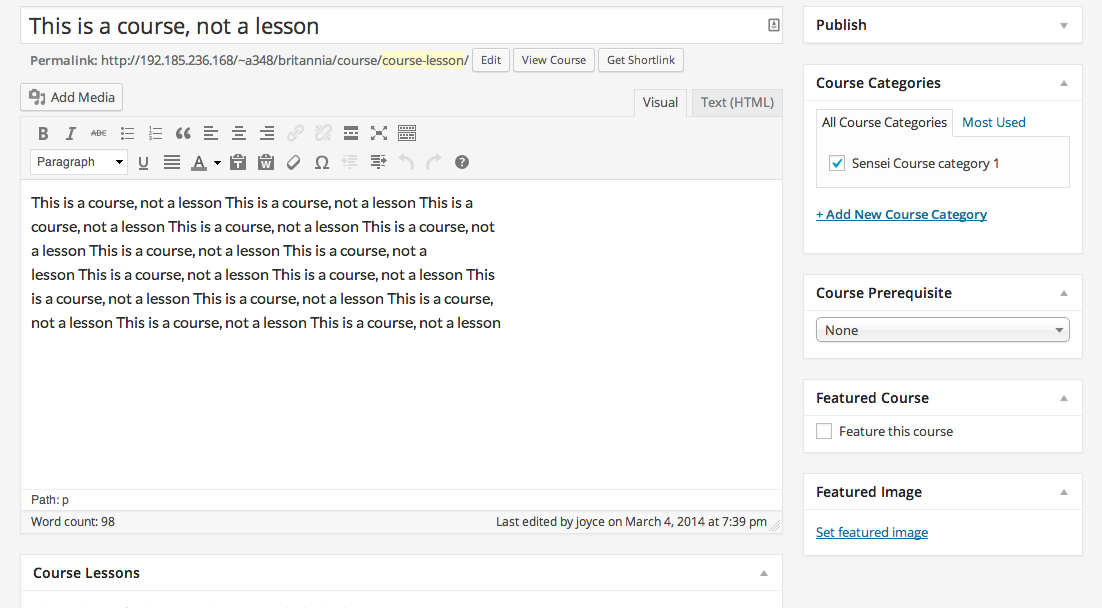
Courses can have one pre-requisite each, which is selected through a drop-down menu on a Course editing screen. This editing screen is much like the ‘regular’ WordPress Page or Post editor.

sensei-lesson-prerequisite-drop-down

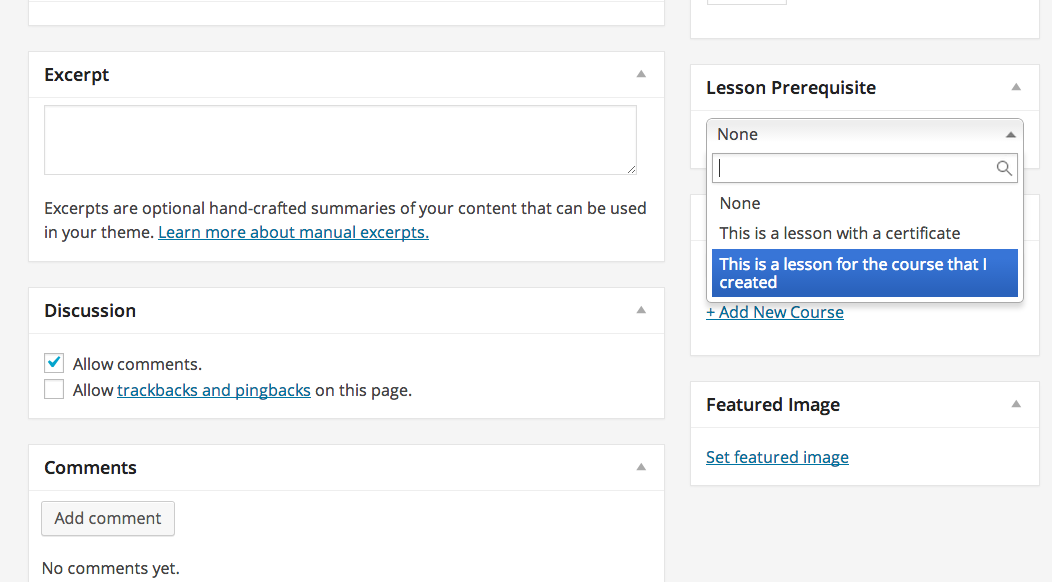
Lessons can also have one pre-requisite each (another pre-created Lesson). The way you make sure someone has taken a Course as a pre-requisite is by making sure the Lesson pre-requisite is not in any other Course (which it can be).

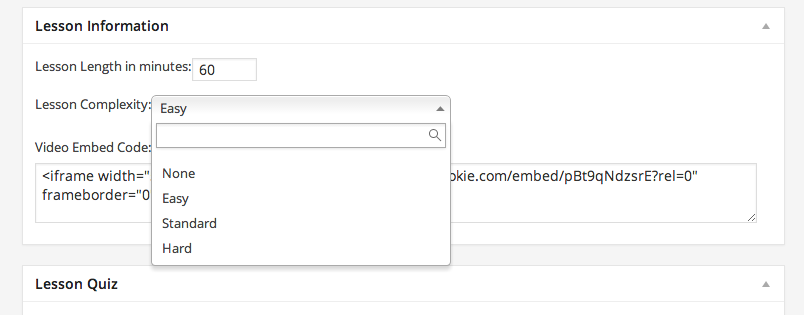
Lessons have an option to enter length and complexity. This info can be helpful for students who want to know what their time and ‘brain power’ investment will be. For example, I may not want to start a “Hard” course that is 2 hours long shortly before going out to dinner, or entering a meeting. But (if Lessons don’t have pre-requisites), I can move on to a 20-minute, “Easy” rated session, coming back to the more difficult one later.

sensei-lesson-difficulty-and-options

Courses can have categories, Lessons can have tags, but not visa versa.

sensei-course-categories-screen

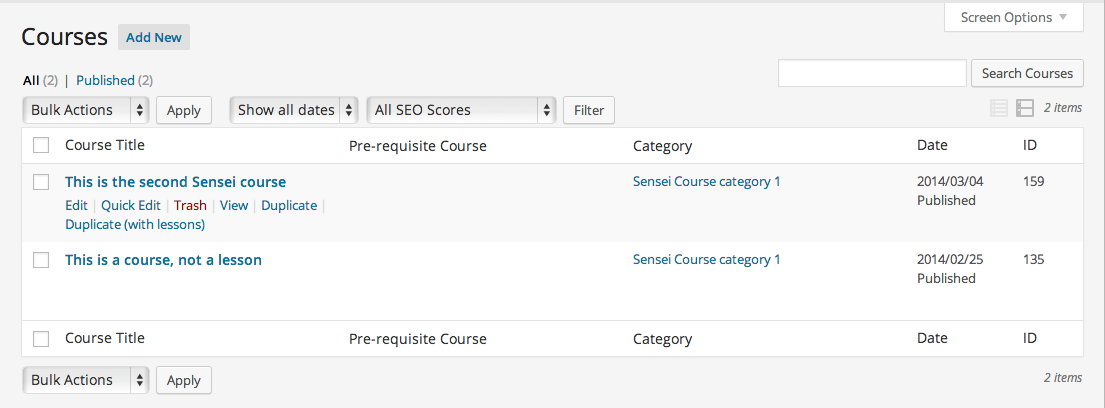
Courses and Lessons have a “duplicate” option in WordPress, for easy re-creations.

sensei-courses-list-with-duplicate-option

Lessons can enable comments, which can allow for class discussion. But after the semester is over you’ll either have to delete the comments or replicate the course and all its lessons to ‘clean up’ the comments area. (Personally I think you shouldn’t use the comments feature for class discussion because it will be hard to organize topics. Rather, opt for a forum plugin like BuddyPress or bbPress. The Sensei team has notified me they are looking into an integration of this type because of its popularity on their idea board.)

Lessons can have an order number (this is key if you don’t want them ordered by date created).

CSV exports are available for Learner, Course and Lesson information on your WordPress install (see link on “Analysis” page screenshot above).

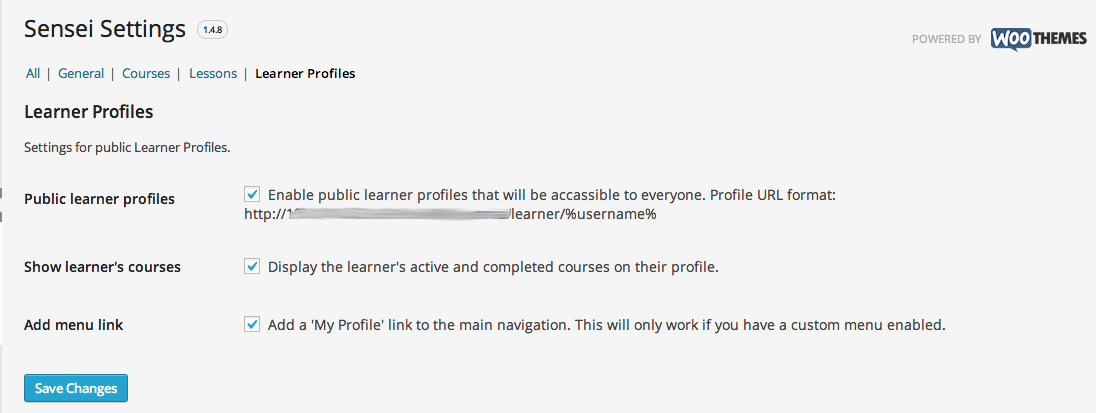
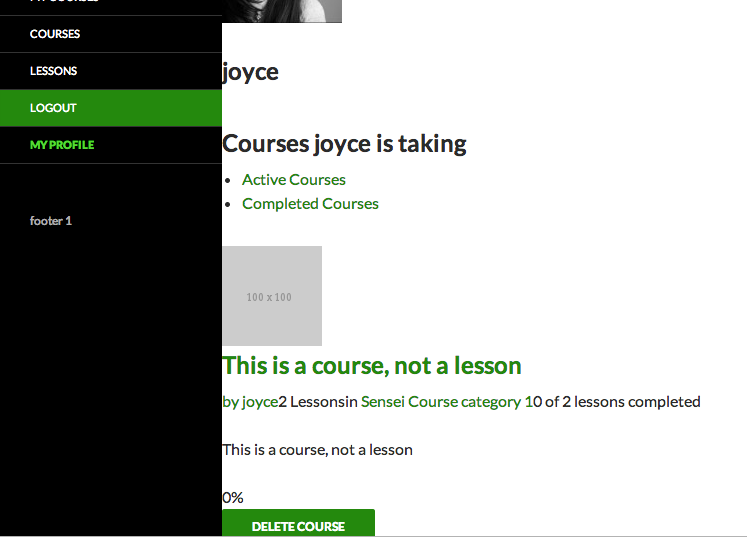
Learner profiles can be switched to private or be made public.

sensei-learner-profile-settings-page
sensei-proflie-page-front-end

Quizzes and Marking

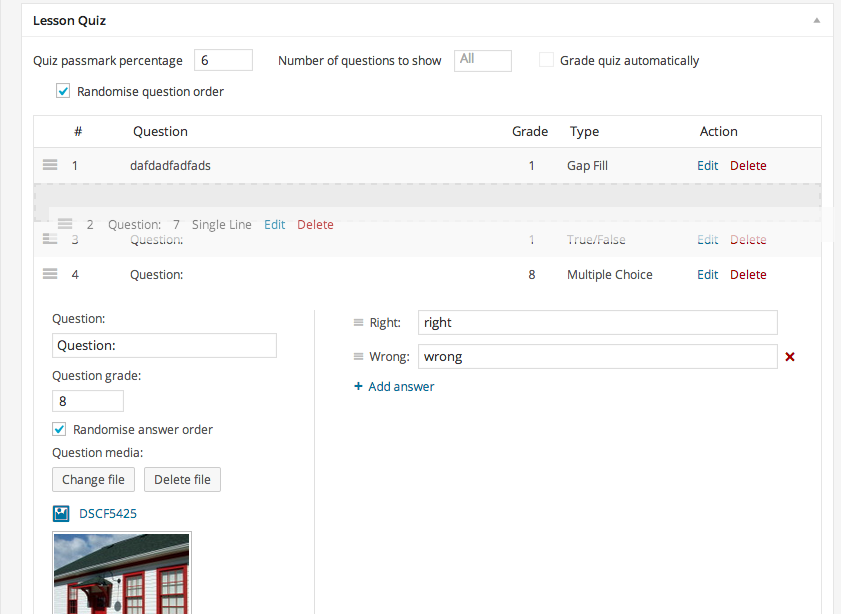
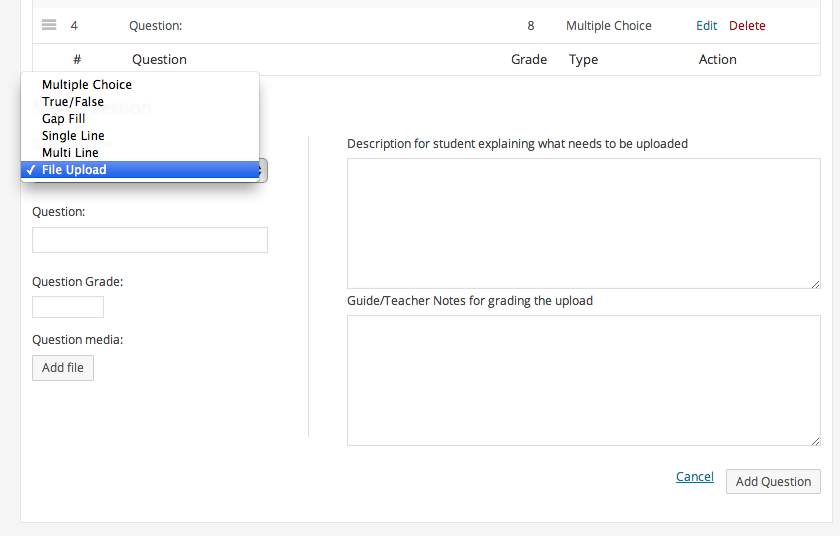
Lessons can have complex quizzes allowing for combinations of question types containing everything from multiple choice, true or false, fill in the gap, short answers, long answers or uploading a file. This is a major improvement in Sensei’s latest release, and well done too, since it was one of its weakest points brought up in reviews around the web.

sensei-quiz-settings-drag sensei-quiz-file-upload

Quiz questions can now also have media attached to them, as with WP Courseware.

Quiz questions can have a randomized order, which helps prevent cheating.

Quizzes now have a drag and drop re-ordering feature (see above screenshot).

Quizzes can have a minimum passing percentage assigned to them, to automate grading and save teachers time. Automatic grading can also be turned off to allow for manual grading.

Quizzes can be re-taken if you check the box to allow this under “Settings.”

An “Analysis” (see above) and “Grading” area shows stats about Courses and Learners including average grades, and the number of completed Courses.

sensei-grading-screen

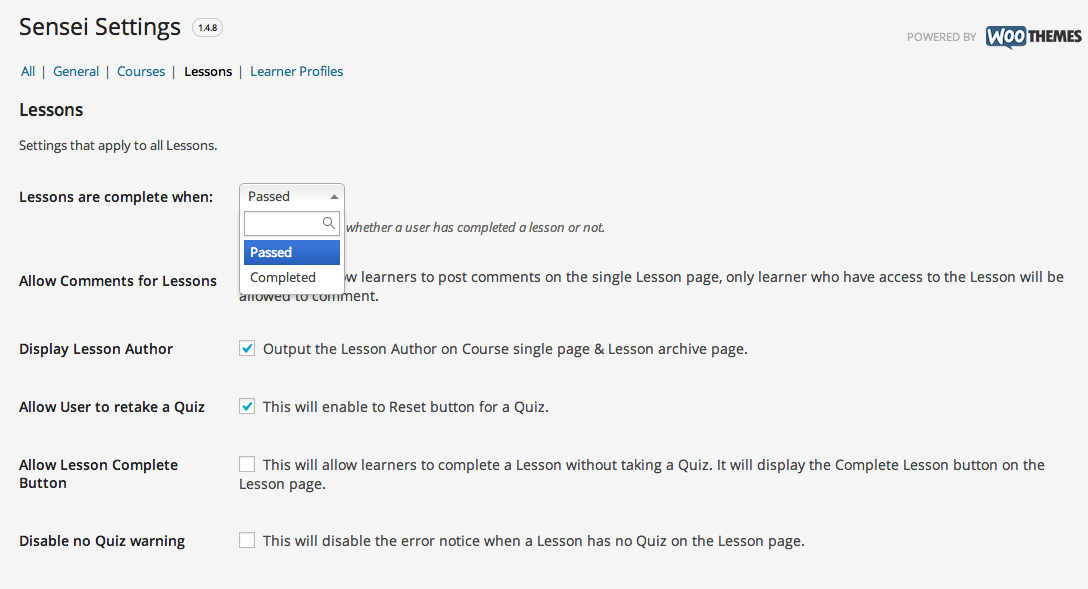
Plugin-wide settings in Sensei allow Courses to be marked “Complete” either when a user actually finishes all the Lessons, or when they achieve a passing mark on the Course.

sensei-complete-when-passed-lesson-settings

Certificates

The usage of Certificates requires downloading an extension to Sensei. Currently this is free.

Certificates can use custom templates or a default template that comes with the extension.

You can assign a different certificate design to different Courses.

Certificate awarding can be controlled so that a student only gets the Certificate if they’ve passed, not just completed a course. A plugin-wide setting controls this (see screenshot above).

Certificates are sent automatically and can’t be manually re-sent by a teacher. However, they are always available in the My Courses area of the plugin, where users manage their Courses.

(Note: Certificates did not work on my installation while doing testing, so we couldn’t get you our own screenshots, however we did not pursue extensive troubleshooting for lack of time. Note that you would get support when buying a WooThemes product to solve issues you may have around this.)

Development Needs

Sensei can be customized with templates (requiring coding skills) and some dashboard settings (mainly to determine image widths), but works best out of the box with select WooThemes. In other words, if you plan to use a non-Woo theme, you’ll need to be prepared for some coding work to get it to look right in some cases, even on the TwentyFourteen ‘default’ theme that comes with all WordPress installations.

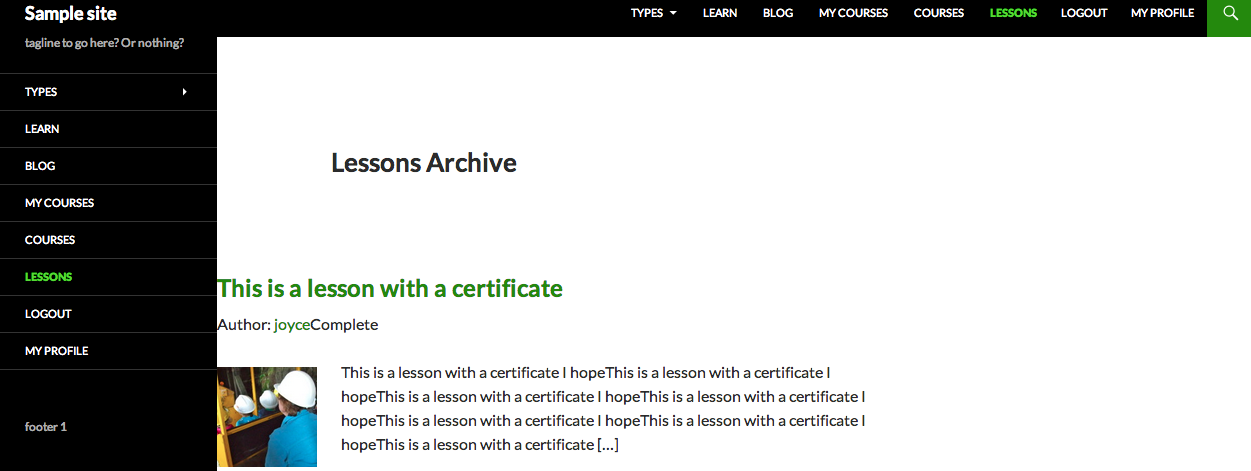
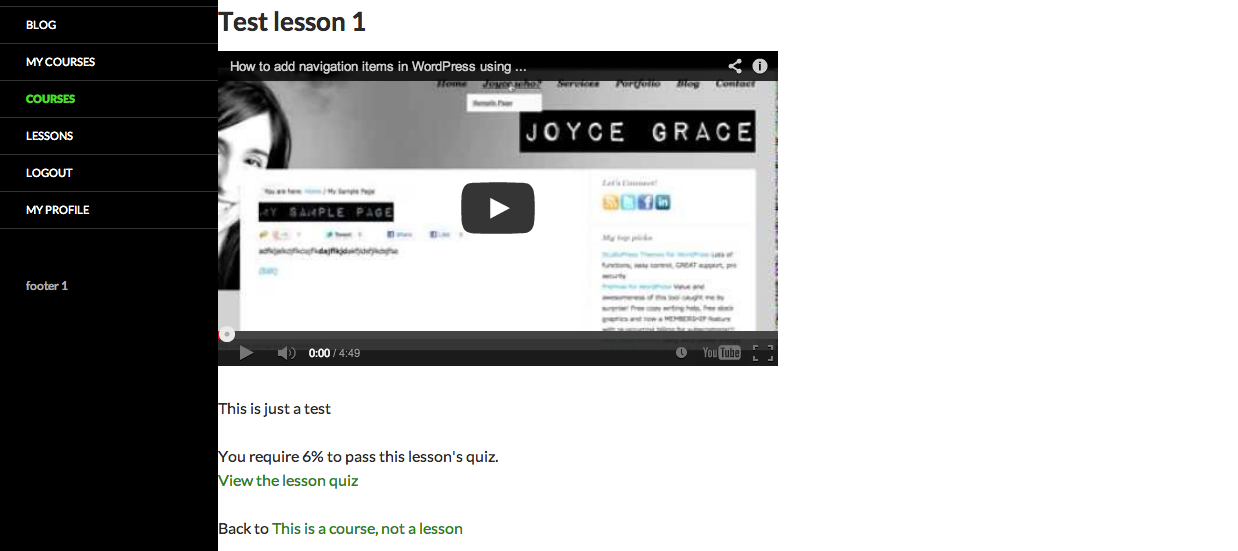
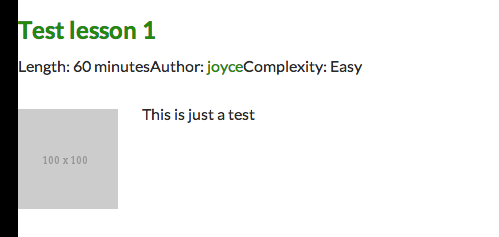
Here are some screenshots of what the plugin pages look like on TwentyFourteen (also see those above). Notice how the default sidebar does not show on these pages (they don’t integrate with your ‘regular’ theme pages or templates) and how the meta data wording bunches up against each other, not to mention the margin and padding issues:

sensei-lessons-archive-not-formatted sensei-front-end-single-lesson sensei-no-formatting-needs-css

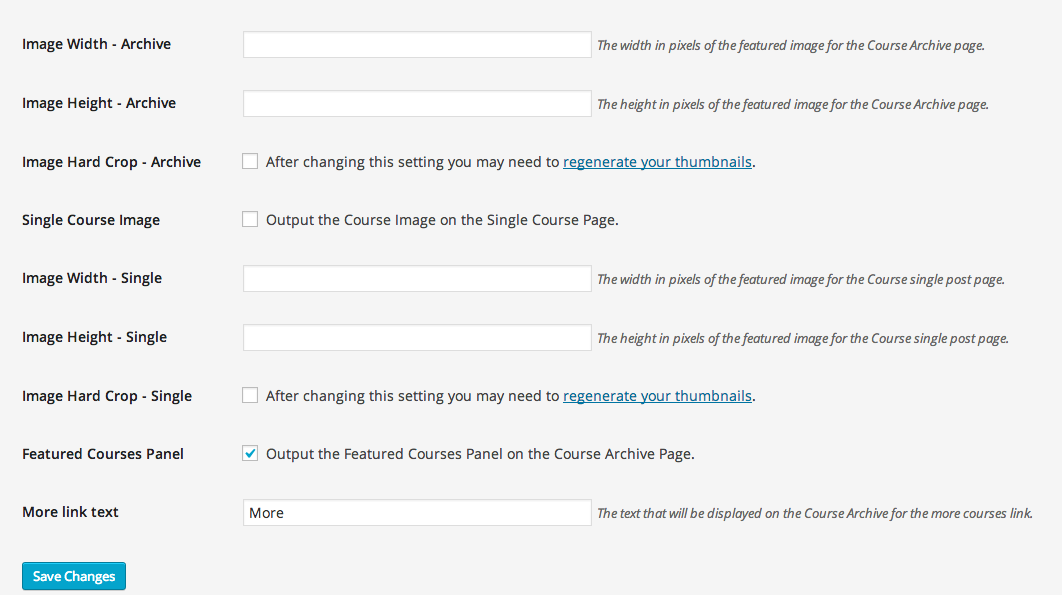
Here is an example of some image settings to control display with Sensei:

sensei-image-settings

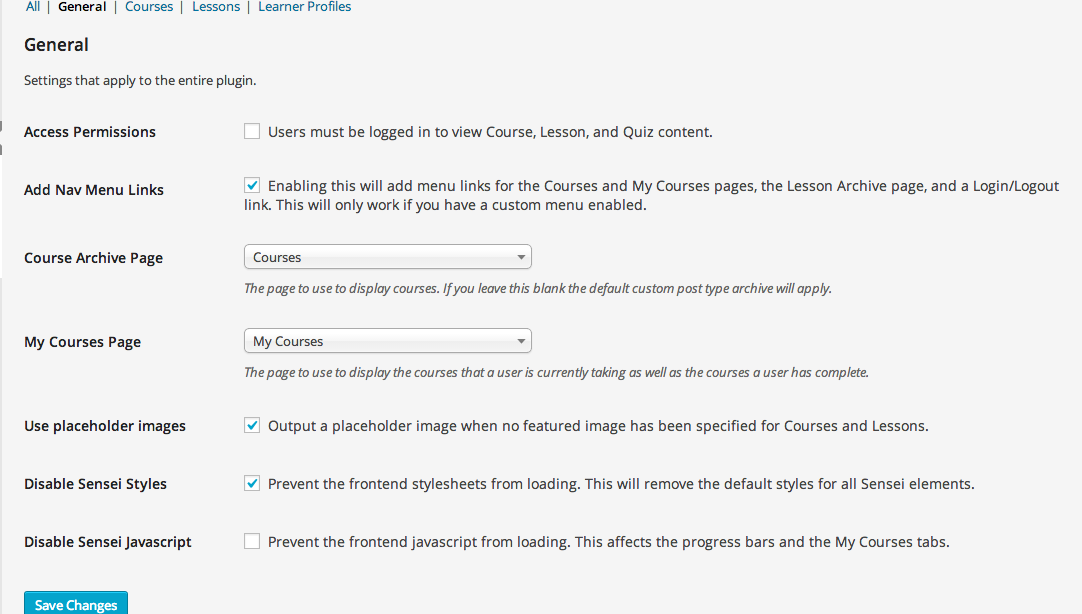
Other general settings that allow you to control where CSS is pulled from:

sensei-general-settings

According to Dan Johnson, who heads up the Sensei team at WooThemes,

For other non-Woo themes, it’s usually just a case of adding some code to the wrapper files as described [here]. Unfortunately, there simply isn’t a way to make Sensei work seamlessly with every theme automatically.

Otherwise, we have a variety of themes (including a free option, Mystile) which all work well with Sensei out of the box. You can view all of our themes that work with Sensei here.

Pitfalls

As explained above, if you’re not a developer, and don’t want to use WooThemes, it may be hard for you to get Sensei looking pretty. In June of 2013 (before their latest release), one blogger wrote about the development weaknesses surrounding Sensei integration with other themes.

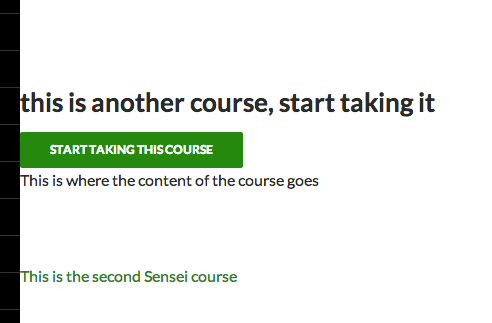
There is no option to add or remove Learners from a course, no way to bulk import Learners, and no way to select current users on the WordPress install to be part of a Course unless you are integrating the plugin with WooCommerce (which will allow you to do so by manually creating an ‘Order’). However, there is a button that says, “Start taking this course,” on the front end of a Sensei page, which allows any user to start a course. Whether the course is paid or free, once they click on that button, that user is automatically added to the “Analysis” area, which can filter the users in each course. But they can’t be removed, unless, as Dan explains, you use a “function to add/remove users from courses, but it requires adding a small snippet of code to one of your theme files.”

sensei-start-taking-course

Sensei at present is not meant to be an all-powerful LMS, as others on the web have noted (or complained about). As Daniel Threlfall says on CMS Critic,

It’s the perfect solution for selling educational services from a blog, or providing employee or subscriber training. It is not, however, designed for large-scale usage by educational institutions.

14 Jun

WP Courseware Tutorial

https://managewp.com/courseware


wp courseware learning management system client logos

WP Courseware Features:

Structure, Controls and Interface:

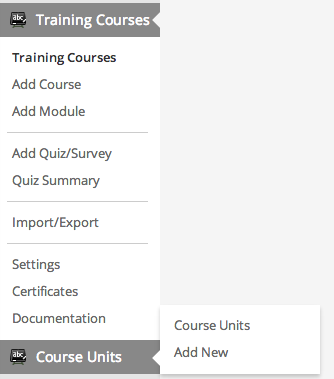
With WP Courseware you have Courses, Units and Modules. Units go inside Modules and Modules go inside Courses.

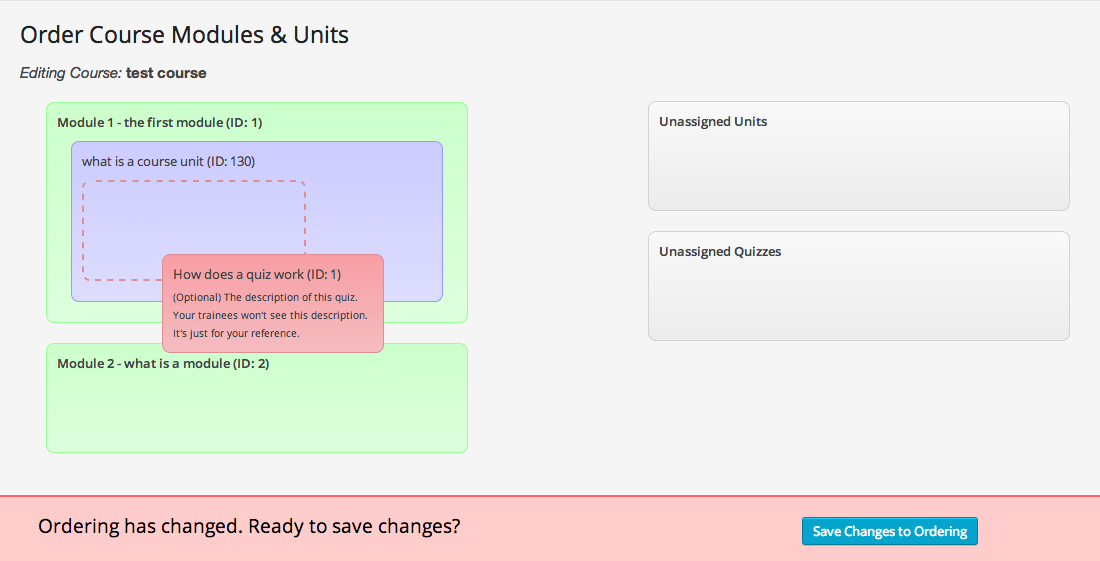
wp-courseware-menu-sideQuizzes go inside Units, but Quizzes are created separately from a different menu. When you work on a Unit, you select from a drop down list what Quiz to add to it. Alternatively you can use their drag and drop interface, which is much easier, but takes a bit of clicking around to find (hint: it’s under “Training Courses” > “Modules, Units & Quiz Ordering”).

wp-courseware-courses-list-screen

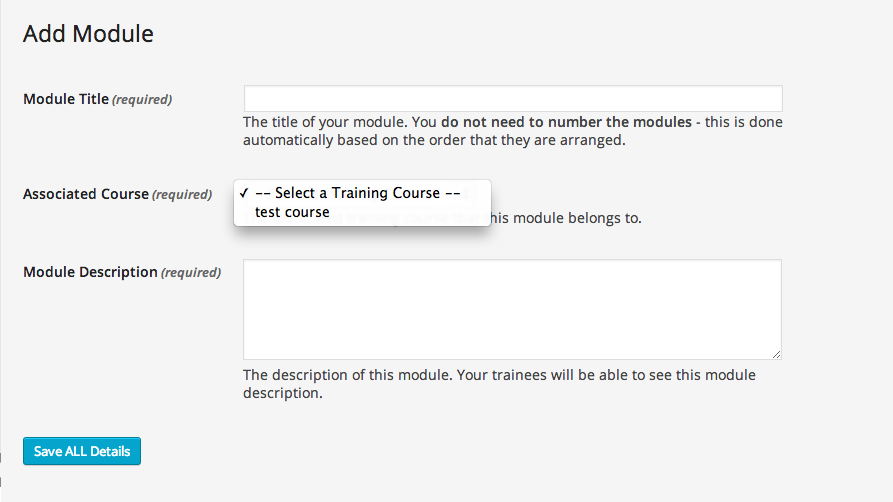
wp-courseware-quiz-drag-dropCourses and Modules are under the same menu in the WordPress Dashboard. Modules don’t really do much except give a description to a set of Units. They can be thought of like “Unit sets.”

wp-courseware-add-module-screenUnits have their own separated menu in the User Interface (UI). This is because Units are where most of your teaching will take place and what you’ll update the most (see above screenshot).

Units have a “duplicate” option for easy re-creation. This would be useful if you wanted the contents of a Unit to be available in more than one Course or Module.

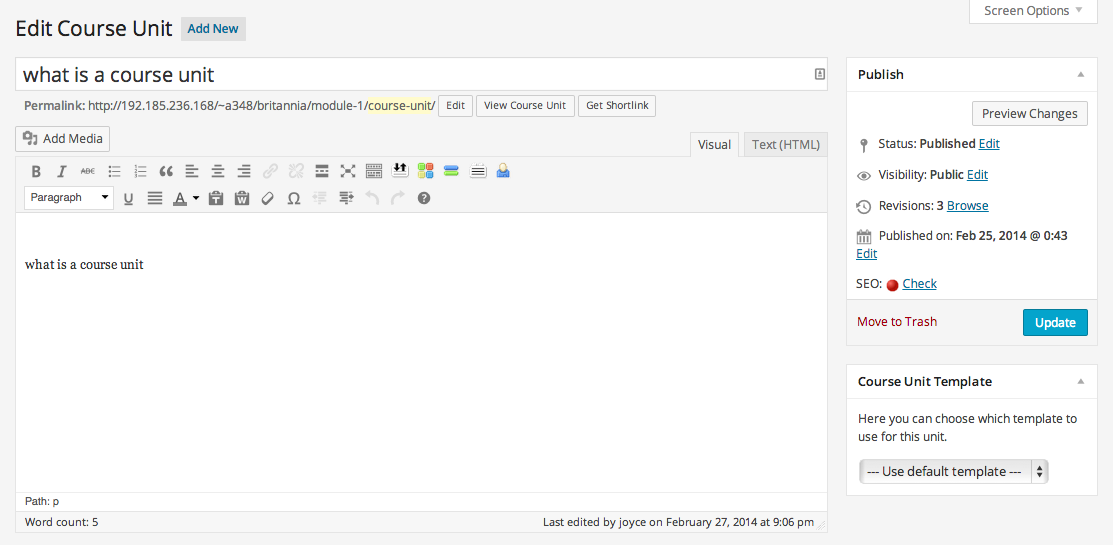
wp-courseware-units-list-screen-with-duplicate-optionUnits are a Custom Post Type. In other words, they ‘look’ just like the Post and Page editor in the WordPress back end, except there are no categories, tags, ordering options or featured images. This is a very simplified editor without custom fields, author boxes, or much other than the basics. The only major option you’ll have here is to choose a template based on a file that you previously coded (techno-phobes need not apply).

wp-courseware-course-unit-single-edit-screenWhen using media to display course lessons, the company developed a way to serve “protected” video content using AmazonS3 cloud storage files. This requires another plugin installation. However, the advantage here is that you won’t have to self-host video content for it to be available to members only.

You can optionally block users from seeing future Units if they haven’t passed previous ones. This is how to create a pre-requisite functionality.

Notifications can be customized, such as those that appear when Units are completed.

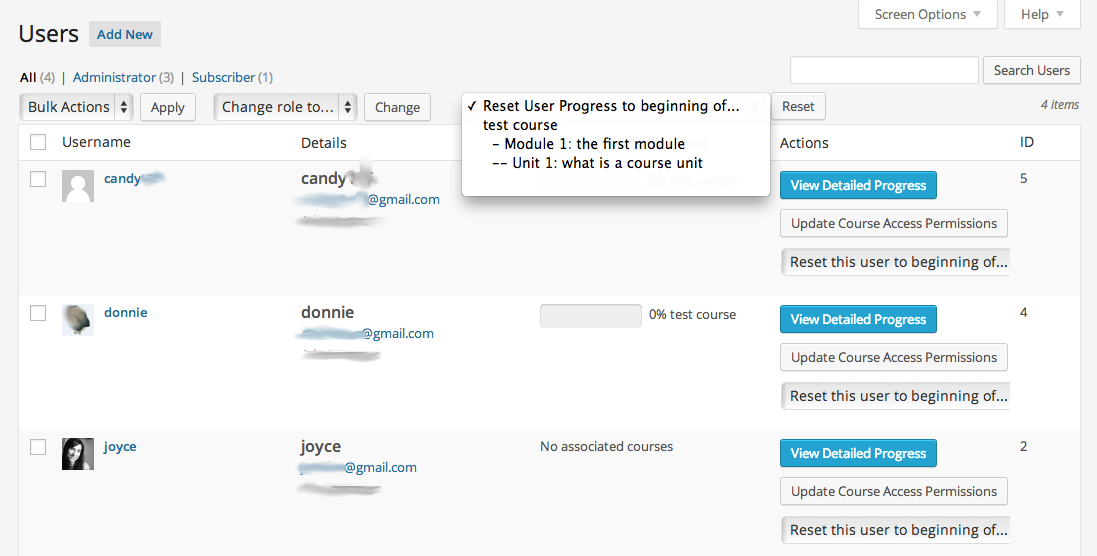
wp-courseware-e-mail-notifications-settingsExisting WordPress users can be individually added to a Course or be revoked from a Course. Users can be individually or collectively set back to the beginning of a Course, Module or Unit. These functions are added to the “Users” menu of WordPress.

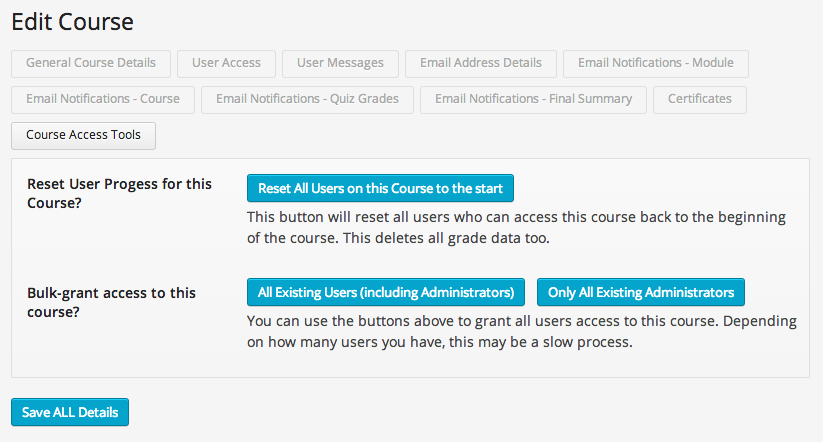
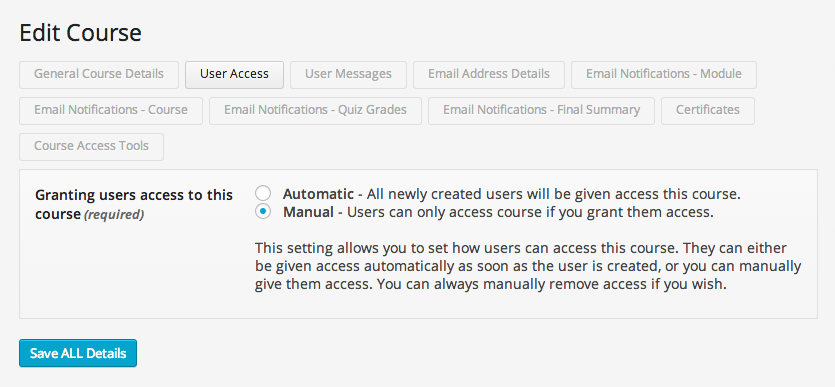
wp-courseware-user-roles-screenYou can give all existing WordPress users bulk access to a Course, or select to only allow all Administrators access.

wp-courseware-course-access

wp-courseware-user-accessYou can bulk import users, and a sample CSV file for doing this is available. This is useful if you already have a class roster or are migrating from a site or plugin.

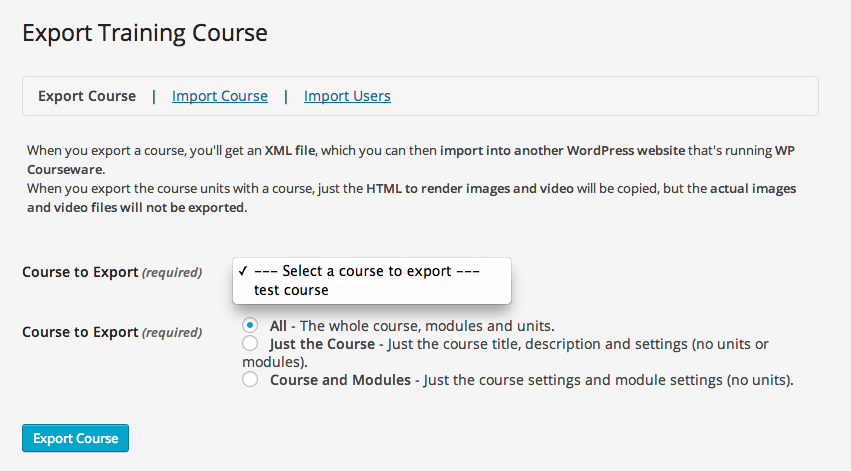
You can export or import Courses, but importing requires the XML file to have been created by the WP Courseware Export function. This is mainly for site migrations.

wp-courseware-import-export-screen

Quizzes and Marking

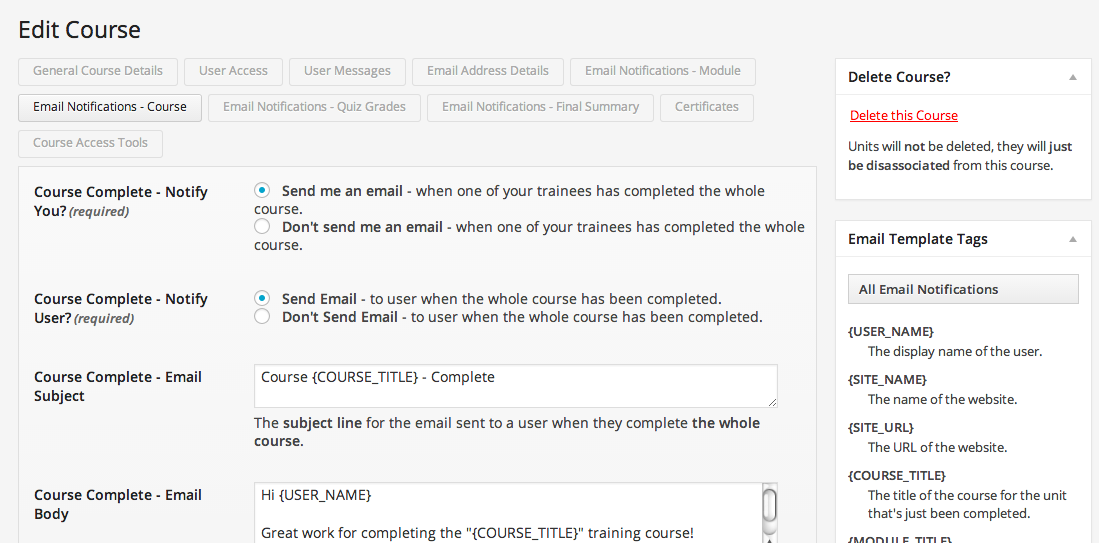
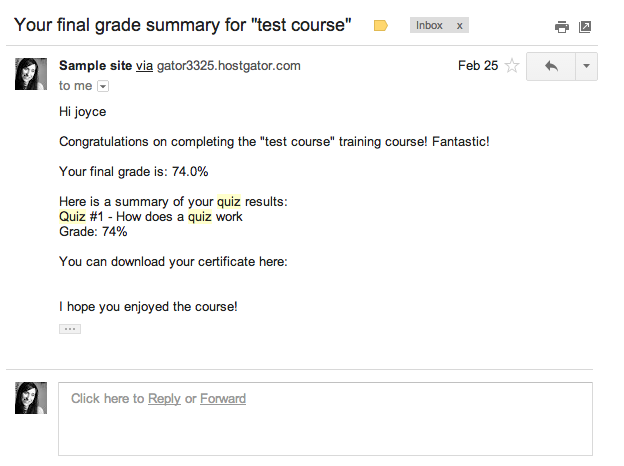
wp-courseware-quiz-summary-screenWP Courseware sends e-mails to students and teachers when milestones are reached (such as completing a course or passing a quiz). E-mails can contain quiz grades, cumulative course grades and links to download a certificate of completion, among others. These are controlled by “E-mail Template Tags” easily accessible in the Course Settings.

wp-courseware-e-mail-sample

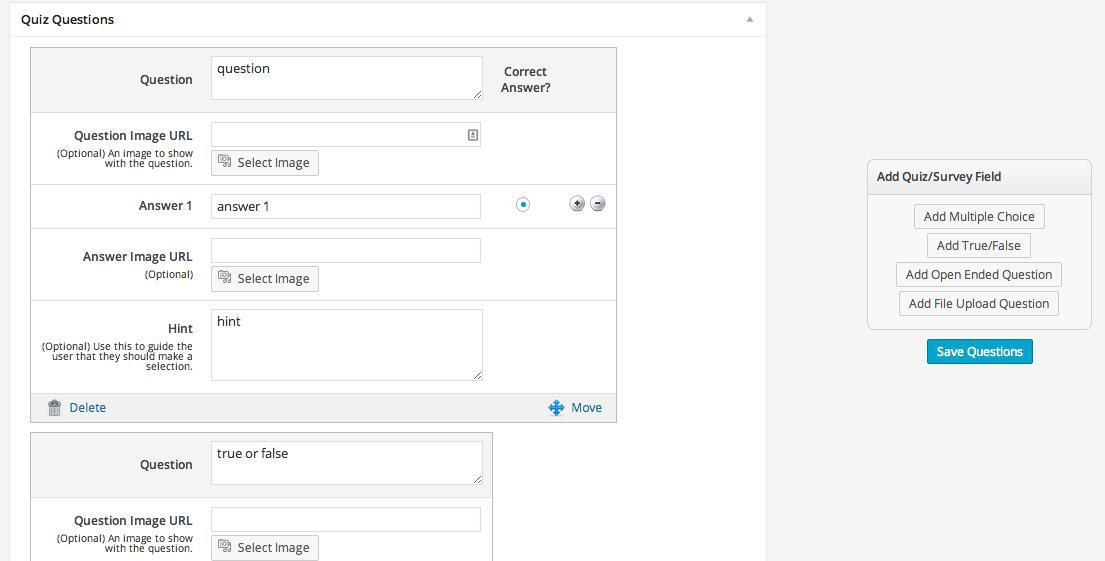
wp-courseware-e-mail-notifications-settingsQuizzes can be multiple choice, true or false, open ended or graded through a file upload.

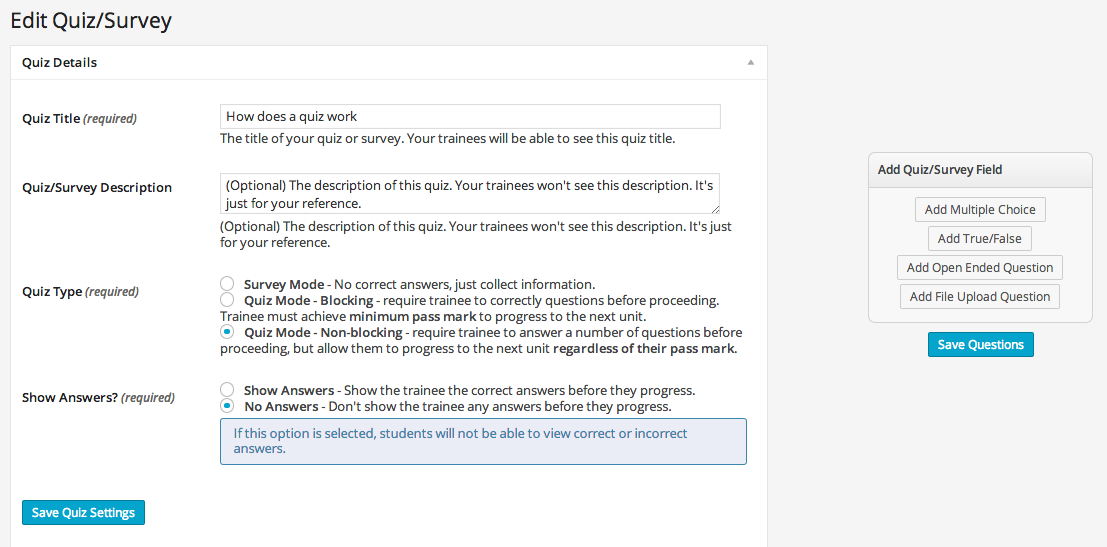
Options for Quizzes are extensive. For example, they can be in “Survey Mode” where there are no correct answers. They can require a minimum passing mark to progress to the next Unit, they can show correct answers before progression, show what was inputted, and explain the answer. They can also be viewed later. These are options, so you can turn them off to prevent class cheating.

wp-courseware-edit-quiz-1

wp-courseware-edit-quiz-questionsQuiz questions come with a drag-and-drop re-ordering feature.

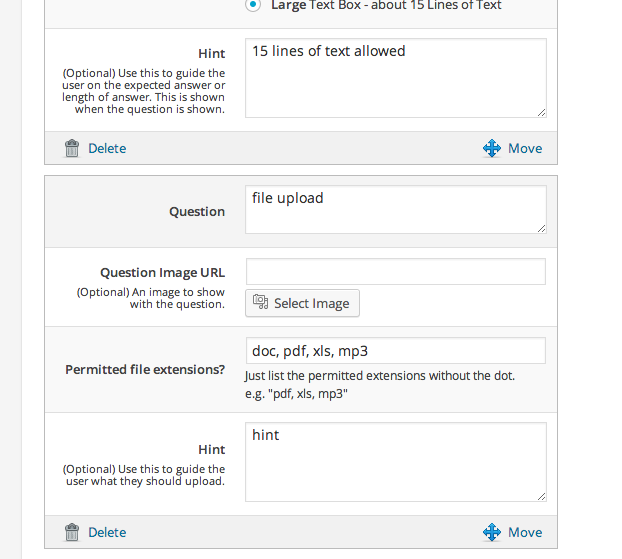
Quizzes can include manual grading, such as for essays or other types of files (like coding files, Excel sheets with formulas in them, or designs made into PDFs, for example). You can limit what types of files may be uploaded, for added security.

Quizzes support media files, so you can have a question that references an image or other file, where the student answers based on what they see or download.

wp-courseware-file-upload-optionsScoring can be automated for non-essay or non-open-ended questions (results are e-mailed).

Avoiding the send-out of Quiz results can be done on a per-Module basis, which is useful for final exams.

If a student fails a quiz, they are automatically asked to re-take it until they pass, if the Quiz is set to “blocking.” They can’t progress to the next Unit until they pass. Or, a teacher can set a Quiz to “non-blocking” so a user only gets one chance to either pass or fail.

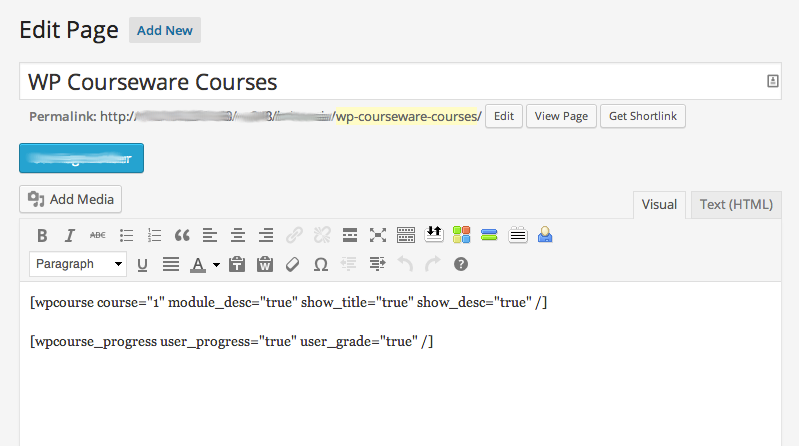
There is a shortcode that can be used to display progress and cumulative grades on a page or post.

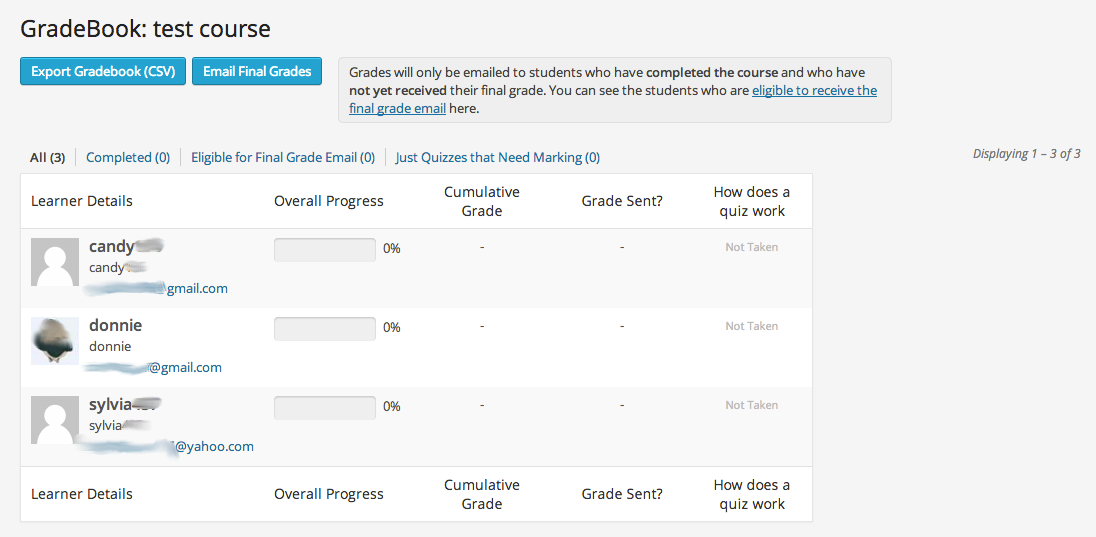
Each course has a “Grade Book” area where teachers can see users enrolled in specific courses. This screen shows students’ progress, grades, quizzes taken, and whether or not they have received their marks. This page also allows for mass e-mailing of final grades to students so long as they have completed the course (this is mainly applicable to quizzes with open ended questions or essays that can’t automate the sending of a final score in the system). The Grade Book can also be exported as a CSV in case teachers need to input information into another school system.

wp-courseware-gradebook

Certificates

Certificates can use a custom background, include your logo and have a text or image-based signature. Certificates are delivered based on the following logic, according to Nate Johnson, co-founder of the WP Courseware plugin:

If a course is set to deliver a certificate, it will do so only after the final unit is marked as complete. If the final unit does not include a quiz, the certificate will be generated when the unit is marked as complete. If the final unit includes a ‘non-blocking quiz,’ meaning progress is not restricted to a passing score, the certificate will be generated when the unit is marked as complete (regardless of quiz score). If the final unit includes a ‘blocking quiz’, meaning a passing score is required, the unit will not be marked as complete until that passing score is achieved and therefore the certificate will not become available until the passing score is achieved.

wp-courseware-certificate settings

Development Needs

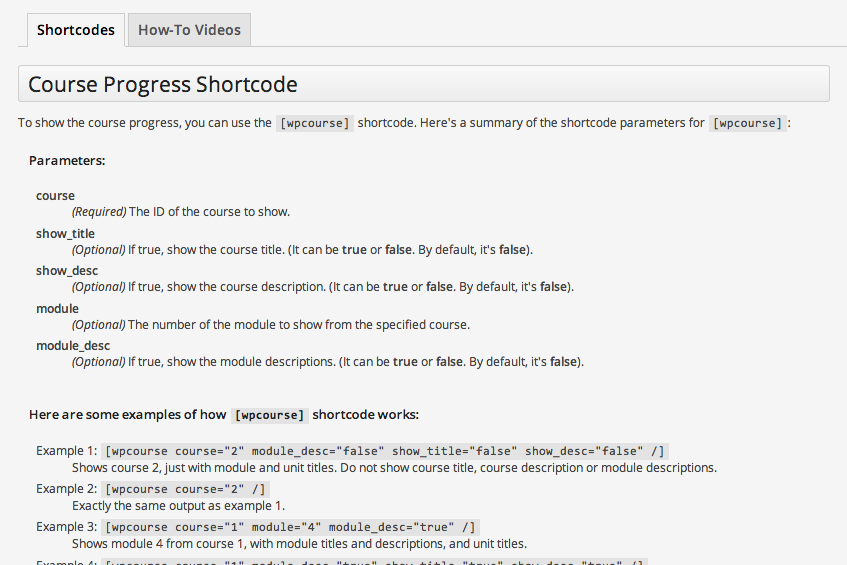
This plugin uses shortcodes to display much of its content. This means pages displaying an ‘archive’ of Courses, Modules or Units is not available by default. A user will need to learn how to manually create these, using the “Documentation” menu (this may not be easy for non-developers).

wp-courseware-documentation-screenThis shortcode usage can come in handy because it allows course information to be displayed within a pre-defined div (such as the ‘regular’ content area of a WordPress Page). This can mean less coding work with theming and templating.

wp-courseware-page-with-shortcodesThere is an option to turn off default CSS so you can style to your heart’s content.

Tables created by the plugin (which contain a lot of its content) may need work to be responsive.

wp-courseware-shortcode-display

Pitfalls

There is currently no way to make course content public. Even if you wanted your courses to be free, a user would have to register to access it. If selling courses, this can be troublesome if you wanted to offer sample lessons or previews of a course to potential buyers.

There is currently no way to give only a portion of WordPress users access to a Course, or revoke (i.e. un-enroll) access. This can be done one-by-one, however.

Courses and Modules don’t have a “duplicate” option, but there is not much to duplicate in those areas anyway. The Units, where most content is entered, does have this.

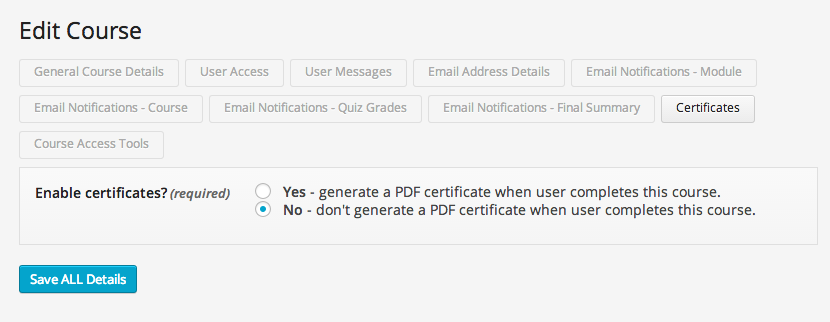
Certificates can only be turned on or off when a user “completes” a course. For Courses with no pre-requisites (i.e. ‘non-blocking’) this means that if users complete a course but fail, they can still download a certificate.

At present Quizzes cannot display a randomized order of questions to help prevent cheating.


13 Jun

Plug ins fuer Content

Shortcodes Ultimate

Großes Shortcode-Paket zur Präsentation von Inhalten.

Shortcodes Ultimate fügt dem Editor mehr als 35 Content-Shortcodes (Tabs, Spoiler…) zur Präsentation von Inhalten hinzu. Vorteil: Auch bei einem Theme-Wechsel sieht alles noch aus, wie es soll.

Simple Post Templates

Templates für widerkehrende Post-Strukturen erstellen.

Wenn Posts nach demselben Muster erstellt werden sollen, ist Simple Post Template sehr hilfreich. Mit dem Plugin kann man Templates für Posts erstellen – und das sehr einfach.

TinyMCE Advanced

Texteditor umfangreich erweitern.

Der Texteditor von WordPress ist ausgezeichnet – aber es geht noch besser. TinyMCE Advanced fügt zahlreiche praktische Optionen hinzu.

Video Thumbnails

Video-Thumbnails von YouTube & Co. automatisch als Artikelbild.

Video Thumbnails ist ein enorm nützliches Plugin, welches die Standbilder (Video Thumbnails) von im Artikel-Editor eingefügten Videos zieht, in die Mediathek lädt und als Artikelbild festlegt – alles automatisch. Unterstützt werden u.a. YouTube, Vimeo und Dailymotion.

TablePress

Tabellen bequem erstellen und verwalten.

TablePress (vormals WP-Table Reloaded) macht das Erstellen und Verwalten von Tabellen zum Kinderspiel – dank des guten Editors mit zahlreichen Optionen und der Abkopplung von Post Types. Die Tabellen werden separat verwaltet und per Shortcode eingefügt, wo man möchte. Ein tolles Plugin, welches schon fast zur Grundausrüstung gehört.

Hyphenator

Automatische Silbentrennung per JavaScript.

Hyphenator ist ein Plugin, welches mittels Hyphenator.js für eine automatische Silbentrennung sorgt. Deutsch wird unterstützt.

Visual Composer

Umfangreicher Drag & Drop Editor für Content.

Visual Composer ist ein Plugin, welches den WordPress-Editor mit einem erweiterten Page Builder ersetzt. Diverse mitgelieferte Content-Elemente (wie von Shortcode-Plugins bekannt) können beliebig in Spalten gezogen, einzeln bearbeitet und per Maus verschoben werden.

Category Order and Taxonomy Terms Order

Kategorien / Taxonomien per Drag & Drop sortieren.

Category Order and Taxonomy Terms Order ermöglicht das Sortieren von Kategorien / Taxonomien – ganz einfach per Drag & Drop.

13 Jun

Plugins fuer Administration

Administration


WP-Optimize

Optimierungs-Tool für die Datenbank.

Mit WP-Optimize kann man angeschwollene Datenbanken verschlanken. Das Plugin löscht Revisionen, Drafts, Spam-Kommentare, abgelehnte Kommentare und optimiert die Tabellen.

User Role Editor

Mächtiger Editor für Benutzerrollen und -rechte.

Mit User Role Editor lassen sich die Rechte der Benutzerrollen detailliert einstellen. Standardmäßig verfügbar sind 62 verschiedene Rechte, weitere lassen sich einpflegen. Außerdem können beliebig viele neue Benutzerrollen erstellt werden. Das Plugin ist kompakt, einfach, in deutscher Sprache und wird gepflegt.

Adminimize

Dashboard-Individualisierung für Benutzergruppen.

Mit Adminimize können unerwünschte Menüpunkte im Dashboard aus- und bei Bedarf wieder eingeblendet werden – sogar Menüpunkte, die von Themes oder Plugins erstellt wurden. Die Einstellungen lassen sich für alle Benutzerrollen separat festlegen, auch für in User Role Editor erstellten Benutzerrollen. Darüber hinaus lässt sich das Dashboard umfangreich anpassen.
Admin Menu Editor

Menü-Editor für die Dashboard-Individualisierung.

Mit Admin Menu Editor kann man Menüpunkte aus dem Dashboard entfernen, neue Menüpunkte hinzufügen, Menüpunkte umbenennen oder einfach die Anordnung ändern – sogar nach Benutzergruppen. Ein ausgezeichnetes Plugin, welches den kompletten Umbau des Menüs spielend leicht ermöglicht – und die Arbeit mit WordPress noch einfacher macht.

CMS Tree Page View

Seitenbaum im Dashboard.

Die Auflistung der angelegten Seiten und Unterseiten im WordPress-Backend könnte übersichtlicher sein – einen richtigen Seitenbaum, wie man ihn aus anderen CMS kennt, gibt es nicht. Abhilfe schafft das Plugin CMS Tree Page View.

Search and Replace

In der Datenbank suchen und ersetzen.

Search and Replace ist ein praktisches Tool, welches im Backend das Suchen und Ersetzen von Einträgen in der Datenbank ermöglicht. Wo, kann gefiltert werden. Ein unverzichtbares Plugin vor allem für Domain-Umzüge, bei denen die Links angepasst werden müssen.

underConstruction

Vorschaltseiten und Zugang nur für eingeloggte Nutzer bei Baustellen und Wartungsarbeiten.

Mit dem Plugin underConstruction kann man eine Vorschaltseite vor eine unfertige Website stellen und die Website nur eingeloggten Nutzern sichtbar machen (Back- und Frontend). Für die Vorschaltseite stehen sowohl Textfelder, als auch ein HTML-Feld zur Verfügung, über das man die Vorschaltseite komplett selbst gestalten kann. Das Plugin eignet sich natürlich auch für Wartungsarbeiten.

Admin Tweaks

Unglaubliches Tool für die Individualisierung der Administrationsoberfläche.

Mit dem Plugin Admin Tweaks sind tiefgreifende Anpassungen der Administrationsoberfläche von WordPress möglich. Die Menge an extrem praktischen Einstellungsmöglichkeiten ist regelrecht umwerfend. Einstellungen gibt es für: Admin Bar, Admin Menus, Dashboard, Post and Page Listing, Post and Page Editing, Media, Widgets, Plugins, Users and Profile, Shortcodes, Login, Maintenance Mode etc. Die Einstellungen lassen sich ex- und importieren.
Dashboard Notepad

Einfaches Notiz-Widget im Dashboard.

Das Plugin Dashboard Notepad fügt im Dashboard ein Widget hinzu, in dem man Notizen, Hinweise und Changelogs eintragen kann. Einfach und praktisch.


MySQLDumper

MySQLDumper ist kein WordPress-Plugin, aber ein hervorragendes Tool, mit dem man auch große Datenbanken zuverlässig sichern und wieder einspielen kann.